Trossen VR Teleoperation
Overview
The trossen_vr package is a C++ and Python SDK for controlling Trossen robot arms using Meta Quest VR controllers over network communication.
This package provides a complete solution for VR-based robot teleoperation, including:
C++ library with network communication and VR data handling
Python bindings for easy integration with Python workflows
Meta Quest VR headset application for wireless control
Event-driven and manual polling control patterns
Dual-arm support with independent deadman switches
Real-time pose and gripper control
Requirements
nlohmann/json >= 3.2
libtrossen_arm (for demos)
Python >= 3.11 (for Python bindings)
uv (for Python environment management)
CMake >= 3.15
C++17 compiler
Installation
System Dependencies
sudo apt install -y cmake build-essential nlohmann-json3-dev
curl -LsSf https://astral.sh/uv/install.sh | sh
Follow the libtrossen_arm C++ installation guide to install the robot driver if you want to run the demos.
Clone Repository
git clone https://github.com/TrossenRobotics/trossen_vr.git
cd trossen_vr
Build C++ Library
# Configure and build
cmake -B build
cmake --build build -j$(nproc)

# Install library and headers (optional, for use in other projects)
sudo cmake --install build
Build C++ Demos (Optional)
# Configure with demos enabled (requires libtrossen_arm)
cmake -B build -DBUILD_DEMOS=ON
cmake --build build -j$(nproc)
Build Python Bindings (Optional)
# Create Python environment
uv sync

# Configure with Python bindings enabled
source .venv/bin/activate
cmake -B build -DBUILD_PYTHON=ON

# Build and install Python module
cmake --build build -j$(nproc)
sudo cmake --install build
VR Headset App
Installing the APK
The Trossen VR Teleop app can be sideloaded onto a Meta Quest headset. First, enable Developer Mode on the headset (Settings > System > Developer), then use one of the methods below.
Using Meta Quest Developer Hub — Windows only
Download and install Meta Quest Developer Hub
Connect the headset to your PC via USB
In MQDH, go to Device Manager > Apps > Install APK and select
assets/VR_Teleop.apk
Using ADB — Linux / Ubuntu
Install ADB:
sudo apt install adb
Fix permissions (required on first use):
# Create udev rules for Meta Quest
echo 'SUBSYSTEM=="usb", ATTR{idVendor}=="2833", MODE="0666", GROUP="plugdev"' | sudo tee /etc/udev/rules.d/51-android.rules
sudo chmod a+r /etc/udev/rules.d/51-android.rules

# Reload udev rules
sudo udevadm control --reload-rules
sudo udevadm trigger

# Restart ADB if running and reconnect headset
adb kill-server
adb start-server
Disconnect and reconnect the headset USB cable after running these commands.
Connect the headset to your PC via USB. Put the headset on — a prompt will appear inside asking you to Allow USB Debugging. Select Always allow from this computer and confirm.
Verify the headset is detected:
adb devicesYou should see a device listed with status
device. If it showsunauthorized, re-check the Allow USB Debugging prompt inside the headset.Install the APK:
adb install assets/VR_Teleop.apk
A
Successmessage confirms the installation completed.
Note
The app will appear in the headset’s App Library. If it is not visible, switch the library filter to Unknown Sources.
App UI
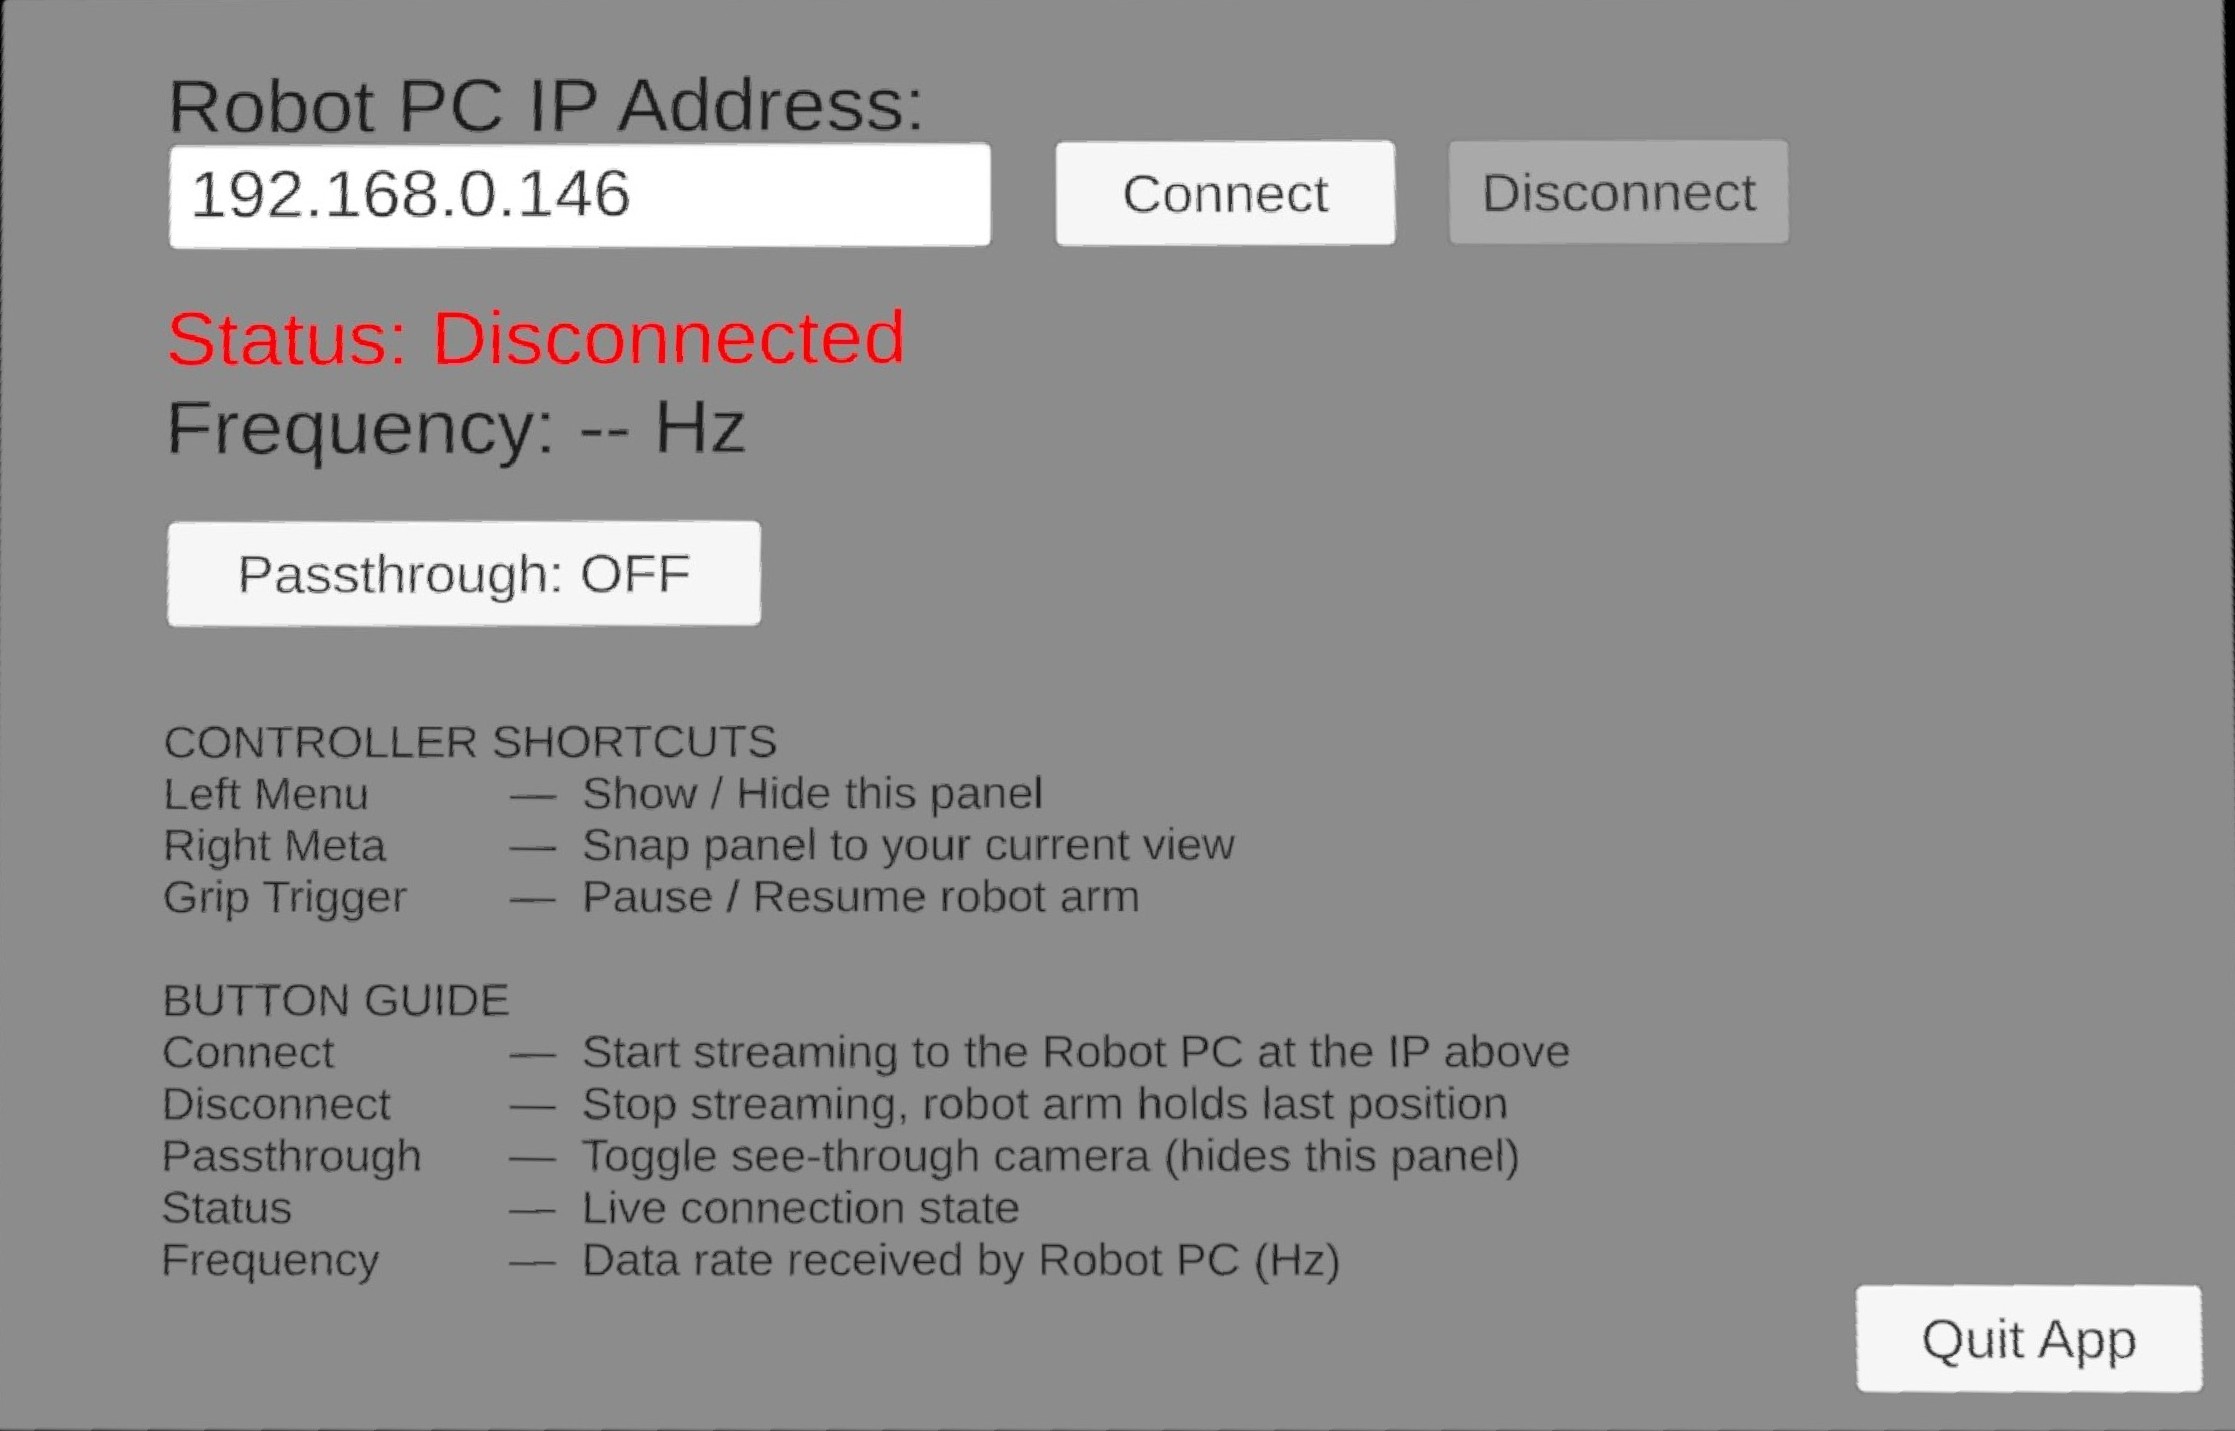
VR Teleop App UI
UI Elements
Element |
Description |
|---|---|
Robot PC IP Address field |
IP address of the PC running this |
Connect |
Connect to the robot PC and start streaming arm data |
Disconnect |
Stop streaming (robot arm holds its last position) |
Status |
Live connection state: |
Frequency |
Data receive rate in Hz (shown once connected) |
Passthrough |
Toggle camera passthrough view |
Quit |
Exit the application |
Controller Shortcuts
Left Menu Button: Show or hide the UI panel
Right Meta Button: Snap the UI panel to in front of your current view
Grip / Hand Trigger (deadman switch): Hold to enable tracking and engage the arm. Release to pause.
Configuring the IP Address
Enter the IP address of the PC running the trossen_vr application or demo in the Robot PC IP Address field, then press Connect. The headset and PC must be on the same network.
Ways of Operating
Once connected, there are two ways to use the app:
Passthrough Mode
Press the Passthrough button in the UI to enable the headset’s cameras so you can see the real world around you. The UI panel will disappear when passthrough is active — press the Left Menu Button on the left controller to bring it back.
Direct View (Headset Removed)
Remove the headset and place it somewhere with a clear view of the controllers — overhead is recommended. This lets you observe the robot directly without a screen.
Warning
Proximity sensor limitation: Meta does not currently provide a built-in option to disable the proximity sensor from within the app — the headset will go to sleep immediately when removed. We will update the app once Meta adds support for this. In the meantime, two workarounds are available:
Meta Quest Developer Hub — Windows only (up to 8 hours): Connect the headset to your PC via USB, open Meta Quest Developer Hub, and disable the proximity sensor under Device Manager > Device actions. This keeps the display on for up to 8 hours.
White tape method: Cover the proximity sensor (located inside the headset near the nose bridge) with a small piece of white tape to trick the sensor into thinking the headset is worn.
Demos
Important
Before running any demo, start the Trossen VR Teleop app on your Meta Quest headset, enter the IP address of the PC, and press Connect Button. The headset and PC must be on the same network.
Tip
Update the robot IP addresses in the demo source files to match your setup. The defaults are 192.168.1.4 (right arm) and 192.168.1.5 (left arm).
Controls
Hand/Grip Trigger: Hold to enable tracking and engage arm (deadman switch). Release to pause.
Index Trigger: Control gripper open/close.
B Button (right controller): Exit program.
Tracking and engagement happen automatically when you hold the hand trigger. Release the trigger to pause control while keeping the program running.
C++ Demos
Located in demos/cpp/:
event_driven_teleop: Event-driven dual-arm teleop using callback handlers. Demonstrates the Teleop API with automatic engage/pause via deadman switch.
manual_polling_teleop: Manual frame polling with inline state tracking. Same functionality, different implementation pattern showing direct frame access.
./build/event_driven_teleop
./build/manual_polling_teleop
Python Demos
Located in demos/python/:
event_driven_teleop.py: Python version of event-driven demo with callback-based control.
manual_polling_teleop.py: Python version of manual polling demo with direct frame access.
uv run demos/python/event_driven_teleop.py
uv run demos/python/manual_polling_teleop.py