Trossen AI Data Collection UI
Overview
The Trossen AI Data Collection UI is a Python-based graphical user interface (GUI) designed for seamless and efficient robotic data collection. It allows users to easily manage robot configurations, record tasks, and streamline data collection with real-time feedback, camera views, task management, and progress tracking. This documentation provides a comprehensive guide to setting up, installing, and using the Trossen AI Data Collection UI, including all its features and functionalities.
Pre-Installation Setup
Before installing the application, complete the following setup steps:
Install Miniconda:
Download and install Miniconda, a minimal installer for Conda. It simplifies package management and deployment of Python environments. Download Miniconda
Create a Virtual Environment:
Use Miniconda to create and activate a virtual environment to ensure a clean setup for the application:
conda create -n trossen_ai_data_collection_ui_env python=3.10 -y
conda activate trossen_ai_data_collection_ui_env
Verify Python Version:
Ensure that Python 3.10 is activated in the environment by running:
python --versionYou should see
Python 3.10.xas the output.
Installation
Once the pre-installation setup is complete, install the Trossen AI Data Collection UI Application.
Install build dependencies on Linux:
sudo apt-get install -y \
    build-essential \
    cmake \
    libavcodec-dev \
    libavdevice-dev \
    libavfilter-dev \
    libavformat-dev \
    libavutil-dev \
    libswresample-dev \
    libswscale-dev \
    pkg-config \
    python3-dev
For other systems, see: Compiling PyAV.
Install the application:
pip install trossen_ai_data_collection_ui
Note
The command above requires sudo privileges and may prompt you for your password.
Post-Installation
After the installation process, run the post-installation script to complete the setup:
The post-installation script sets up additional configurations, including:
Cloning and installing required dependencies for Interbotix/lerobot.
Resolving common issues with OpenCV and video encoding libraries.
Creating a desktop icon for easy access to the application.
Run the following command to complete the post-installation setup:
trossen_ai_data_collection_ui_post_install
Once the desktop icon is created, right-click on it and select Allow Launching to ensure the application has the necessary permissions to run.
Note
Touchscreen Interface Setup: If you plan to use a touchscreen display with the Trossen AI Data Collection UI, refer to the Touchscreen Setup guide for complete hardware setup, cable connections, and touchscreen mapping configuration.
Updating the Application
To update to the latest version of the Trossen AI Data Collection UI, follow these steps:
Activate your virtual environment:
conda activate trossen_ai_data_collection_ui_env
Update the application package:
pip install trossen_ai_data_collection_ui --upgrade
Run the post-installation script:
trossen_ai_data_collection_ui_post_install
The post-installation script will pull the latest updates from the Interbotix/lerobot repository and rebuild it in your environment.
Note
The UI application uses a local copy of the Interbotix/lerobot repository stored at ~/.lerobot_trossen_ai_data_collection_ui/.
Do not manually edit files in this directory, as it may cause compatibility issues with the UI application.
The post-installation script manages this repository automatically.
Launching the Application
Once the installation and post-installation setup are complete, you can launch the Trossen AI Data Collection UI through either the desktop application or via the command line.
Desktop Application
After installation, a desktop shortcut named Trossen AI Data Collection UI will be available on your desktop. Simply click the shortcut to launch the application.
Command Line
Alternatively, you can run the application directly from the terminal:
trossen_ai_data_collection_ui
Application Overview
The Trossen AI Data Collection UI is organized into several sections, each providing specific functionality for managing and monitoring your data collection sessions.
Keyboard Shortcuts
The application supports the following keyboard shortcuts:
Full Screen Toggle (F11)
Press F11 to toggle full-screen mode for the application window. This is particularly useful for:
Moving the application between different displays
Maximizing screen real estate on the touchscreen display
Adjusting the window position before entering full-screen mode
To move the application to a different display:
Press F11 to exit full-screen mode (if the application is in full-screen)
Drag the application window to the touchscreen display
Press F11 again to return to full-screen mode on the correct display
Quit Application (Ctrl+Q)
Press Ctrl+Q to safely exit the application. This is equivalent to selecting Quit from the menu bar.
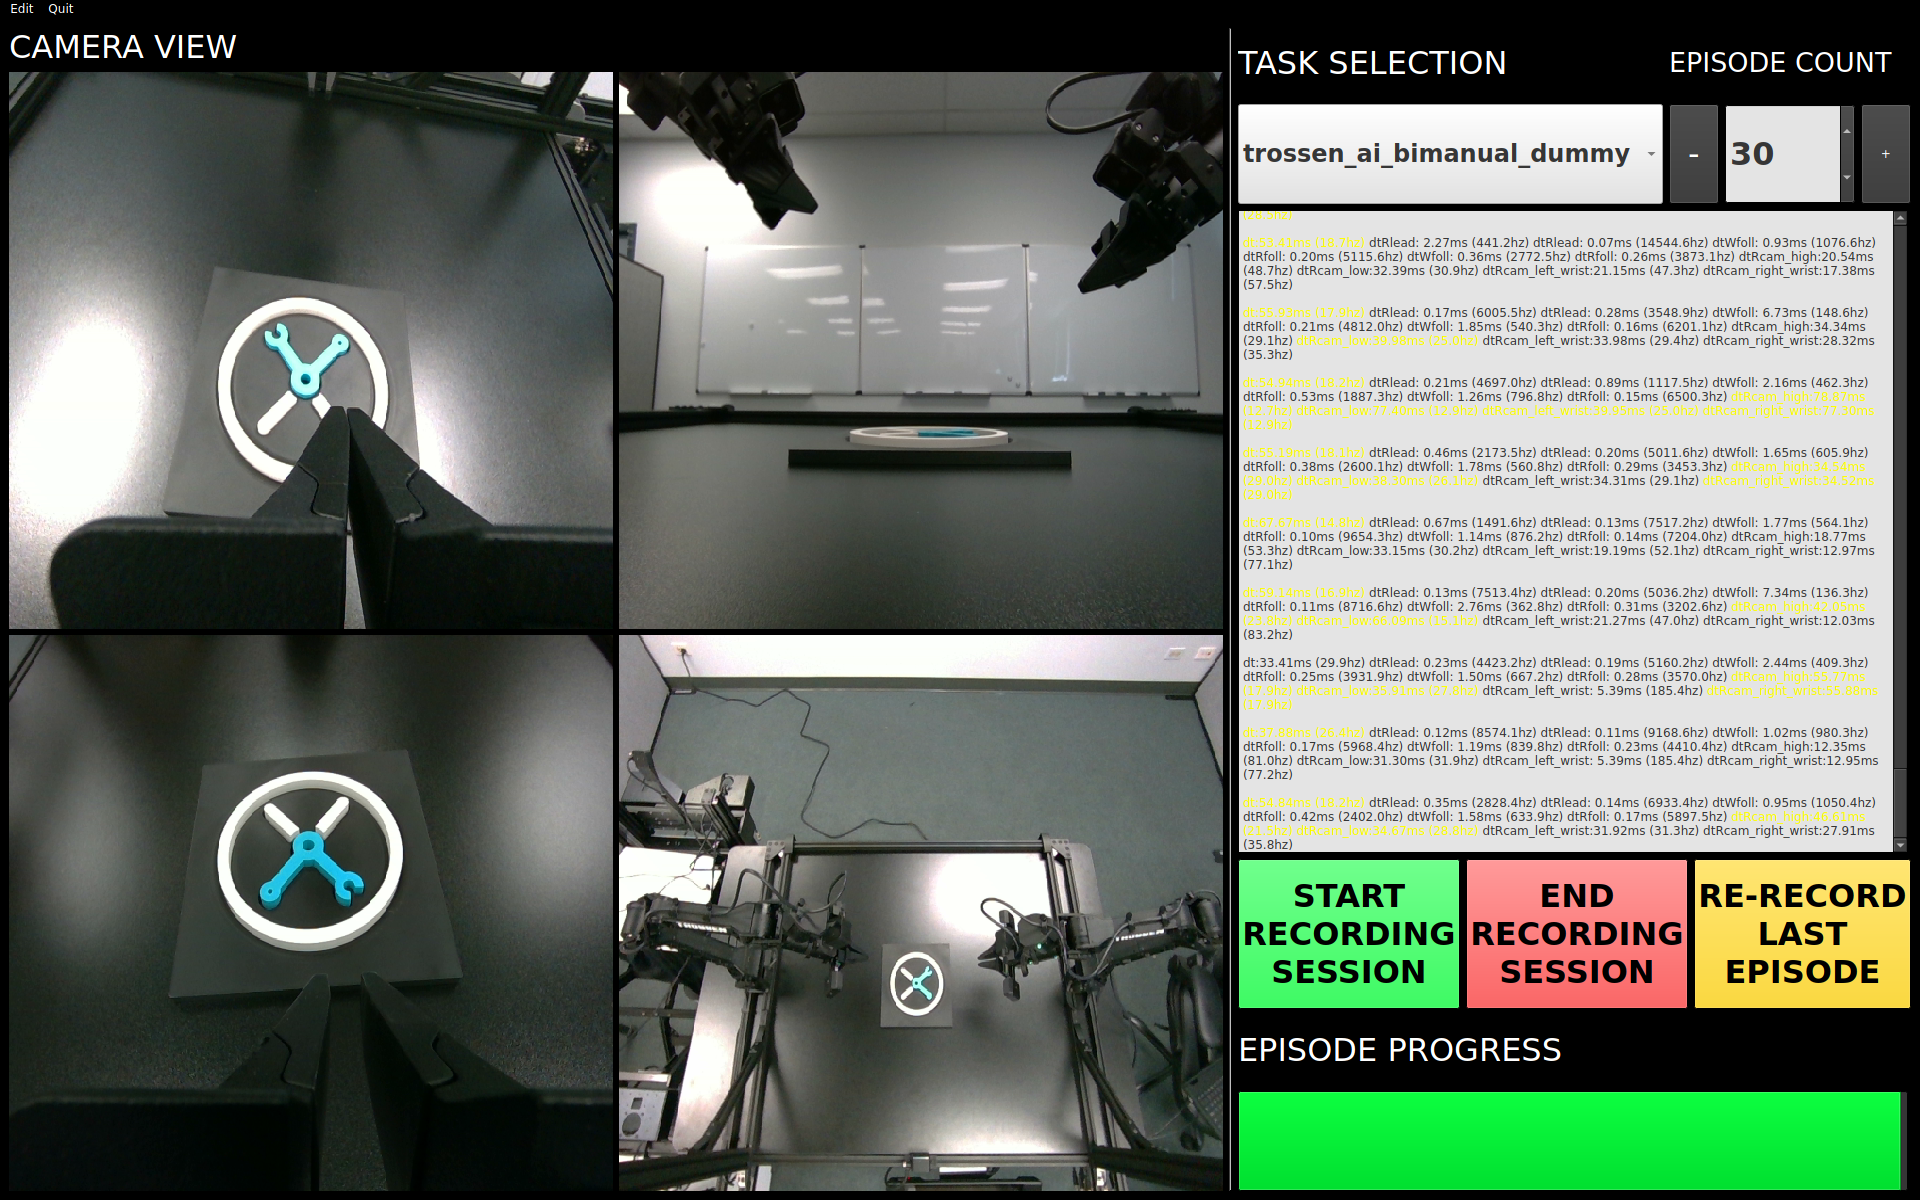
Task Management Panel
The task management panel is located in the upper right section of the interface:
Task Selection Dropdown
A dropdown menu displaying all available tasks configured in your task configuration YAML file:
Shows task names (e.g., “trossen_ai_solo_dummy_2”)
Updates the session parameters when a new task is selected
Displays “Selected new task: [task_name]” message when changed
Automatically loads associated robot configuration for the selected task
To switch tasks:
Click the dropdown menu
Select the desired task from the list
The UI will update with the new task’s parameters
Episode Count Selection
A numeric spinbox showing the target number of episodes for the current session:
Located next to the task selection dropdown
Default value shown (e.g., “30”)
Can be adjusted using:
+ button: Increment episode count
- button: Decrement episode count
This determines how many episodes will be recorded in the current data collection session
Camera View Section
The camera view section occupies the left side of the interface and provides real-time visual feedback:
Camera Feed Windows
Displays live video feeds from all configured cameras:
Typically shows 4 camera views in a 2×2 grid layout:
Top-left: High-angle camera (
cam_high)Top-right: Low-angle camera (
cam_low)Bottom-left: Right wrist camera (
cam_right_wrist)Bottom-right: Left wrist camera (
cam_left_wrist)
Each window shows:
Live video stream from the corresponding camera
The UI refreshes the displayed frames at the
display_fpsfrequency specified in the task YAML fileDisplays a “No Camera” icon when a camera is disconnected, not configured, or when recording is not active.
Camera Feed Display FPS
Displayed at the top of the camera view section (e.g., “Camera Feed Display FPS: 0”):
Shows the current refresh rate of camera displays in the UI
Controlled by the
display_fpsparameter in task configurationValues:
0: Camera displays are disabled (performance mode)
1-5: Low refresh rate (recommended for most use cases)
10-30: Higher refresh rate (smoother visuals, higher CPU usage)
This only affects UI display; actual recording always uses the
fpsparameterLower values improve performance on resource-constrained systems
Display FPS applies to both recording and dry run modes
Progress Tracking Section
Located in the lower right section, this area provides real-time feedback on session progress:
Episode Progress Bar
A visual progress bar showing completion status for the current episode:
Label: “EPISODE PROGRESS”
Fills from left to right as the episode progresses
Shows percentage completion of the current episode based on elapsed time vs.
episode_length_sResets to 0% when starting each new episode
Updates at the
display_fpsfrequency defined in the task configuration.
Example:
- If episode_length_s is 10 seconds and 5 seconds have elapsed, progress shows 50%
Total Time Display
Displays the total duration configured for the current episode:
Label: “Total Time:”
Shows the episode duration in seconds as defined by
episode_length_sin the task configurationThis is a static value displaying the target episode length (e.g., “Total Time: 10” for a 10-second episode)
Does not track elapsed time; instead shows the total allocated time for each episode
Helps users know the expected duration of the recording session
Log Terminal
Although not always visible in the main UI, the log terminal provides detailed status messages:
Displays real-time system messages and status updates
Shows:
Connection status for arms and cameras
Episode start/end notifications
Error messages and warnings
Data saving confirmations
Task selection changes
Configuration loading status
Configuring the Robots
The Trossen AI Data Collection UI provides a user-friendly interface for configuring robot settings such as camera serial numbers and arm IP addresses. To configure the robot, follow these steps:
Launch the application and click on
Editin the top-left menu. Then selectRobot Configuration.In the
Robot Configurationwindow, you will be able to modify the YAML file that contains all robot-specific settings.Update the relevant fields such as camera serial numbers and arm IP addresses as needed.
We support three robot configurations trossen_ai_stationary, trossen_ai_mobile, and trossen_ai_solo.
An example configuration for the stationary robot is shown below:
trossen_ai_stationary:

    max_relative_target: null

    min_time_to_move_multiplier: 3.0

    camera_interface: 'opencv'

    leader_arms:
        right:
            ip: '192.168.1.3'
            model: 'V0_LEADER'
        left:
            ip: '192.168.1.2'
            model: 'V0_LEADER'

    follower_arms:
        right:
            ip: '192.168.1.5'
            model: 'V0_FOLLOWER'
        left:
            ip: '192.168.1.4'
            model: 'V0_FOLLOWER'

    cameras:
        cam_high:
            serial_number: 000123456789
            width: 640
            height: 480
            fps: 30
        cam_low:
            serial_number: 000123456789
            width: 640
            height: 480
            fps: 30
        cam_right_wrist:
            serial_number: 000123456789
            width: 640
            height: 480
            fps: 30
        cam_left_wrist:
            serial_number: 000123456789
            width: 640
            height: 480
            fps: 30
max_relative_target: Limits the magnitude of the relative positional target vector for safety purposes. Set this to a positive scalar to have the same value for all motors. The magnitude defines the maximum distance (in radians for rotational joints and meters for linear joints) that the end-effector can be commanded to move in a single command. When you feel more confident with teleoperation or running the policy, you can extend this safety limit and even remove it by setting it tonull.min_time_to_move_multiplier: Multiplier for computing minimum time (in seconds) for the arm to reach a target position. The final goal time is computed as: min_time_to_move = multiplier / fps. A smaller multiplier results in faster (but potentially jerky) motion. A larger multiplier results in smoother motion but with increased lag. A recommended starting value is 3.0.camera_interface: Set this according to the camera interface you want to use.opencvis the default and recommended option.intel_realsensecan be used if you have Intel RealSense cameras connected to the system.
leader_arms: Contains the IP addresses and models of the leader arms.ip: Update the IP addresses to match those assigned to your leader arms.model: The currently supported leader arm model isV0_LEADER.
follower_arms: Contains the IP addresses and models of the follower arms.ip: Update the IP addresses to match those assigned to your follower arms.model: The currently supported follower arm model isV0_FOLLOWER.
Note
Refer to Setup IP Address for more details on obtaining IP addresses.
cameras: Thecamerassection defines the configuration for each camera used in the system. Each camera entry (such ascam_high,cam_low,cam_right_wrist, andcam_left_wrist) includes:serial_number: The unique identifier for the camera device. Forintel_realsensecameras, use the actual device serial number (e.g., 123456789). Foropencvcameras, specify the camera index (e.g., 0, 1, 2). Refer to Camera Serial Number for instructions on finding serial numbers for both Intel RealSense and OpenCV cameras.width: The width of the camera image in pixels.height: The height of the camera image in pixels.fps: The desired frames per second for capturing images.
Note
Do not change the camera names (e.g.,
cam_high,cam_low, etc.) as they are referenced in the application for creating predefined robot layouts.Ensure that the specified FPS is supported by the camera hardware.
Larger resolutions may require more processing power and could impact the overall system performance.
Configuring the Tasks
The Trossen AI Data Collection UI allows users to configure various tasks for data collection. To configure tasks, follow these steps:
Launch the application and click on
Editin the top-left menu. Then selectTask Configuration.In the
Task Configurationwindow, you will be able to modify the YAML file that contains all task-specific settings.Update the relevant fields such as task names, parameters, and other configurations as needed.
An example configuration for tasks is shown below:
- task_name: "trossen_ai_stationary_dummy"
  robot_model: "trossen_ai_stationary"
  task_description: "A dummy task for the Trossen AI Stationary robot."
  episode_length_s: 10
  warmup_time_s: 5
  reset_time_s: 5
  hf_user: "YourUser"
  fps: 30
  push_to_hub: false
  play_sounds: true
  disable_active_ui_updates: false
  save_interval: 1
  display_fps: 1
  operators:
  - name: "YourOperator0"
    email: "[email protected]"
  - name: "YourOperator1"
    email: "[email protected]"
task_name: Name of the task. This should be unique for each task. This will also set the name of the dataset.robot_model: The robot model associated with the task. This should match one of the robot configurations defined in the robot configuration YAML.task_description: A brief description of the task.episode_length_s: Duration of each episode in seconds.warmup_time_s: Time in seconds to wait before starting the episode.reset_time_s: Time in seconds to wait after the episode ends before resetting.hf_user: Your Hugging Face username. This is used if you plan to push data to the Hugging Face Hub.fps: Frames per second for data collection.push_to_hub: Boolean flag indicating whether to push the collected data to the Hugging Face Hub.play_sounds: Boolean flag indicating whether to play sounds during the task.disable_active_ui_updates: Boolean flag to disable active UI updates during the task.save_interval: Interval in episodes at which to encode images to video and save data to disk. For example, if set to 5, data will be saved every 5 episodes. Default is 1 (save after every episode). Setting save interval to-1,0, or> total number of episodeswill only save data at the end of the entire data collection session.display_fps: Controls how often camera images are refreshed in the UI (frames per second). The UI uses frame-skipping to render only at the specified frequency, reducing compute load while keeping controls responsive. Applies to both recording and dry-run modes. Default: 1 FPS. Increase for smoother visuals at the cost of more processing; decrease to improve performance.operators: Optional list of operators involved in the task. The operator information will be saved ininfo.jsonin the metadata folder. You can add multiple operators by specifying their names and email addresses. You can add, remove, or edit operators at any time; the most recent changes to the operator list will be reflected in the metadata.name: Name of the operator.email: Optional email address of the operator.
Note
If you choose to push data to the Hugging Face Hub, ensure that you have an account and have set up the necessary authentication. Check out the Logging into Hugging Face for more details on generating and using access tokens.
Note
The video encoding process can be resource-intensive.
This can cause longer wait times between episodes, especially if you are recording at longer episode lengths.
To mitigate this, consider adjusting the save_interval parameter to save data less frequently or at the end of the entire session.
Experimental Features
Note
The following features are experimental and may not be fully stable. Use them at your own discretion.
GPU Acceleration for Video Encoding
The application supports GPU acceleration for video encoding using NVIDIA GPUs with CUDA support. To enable this feature, ensure that you have the necessary NVIDIA drivers and CUDA toolkit installed on your system. You can enable GPU acceleration by setting the
LEROBOT_GPU_ENCODINGenvironment variable.export LEROBOT_GPU_ENCODING=1
You can also choose the GPU device by setting the
LEROBOT_GPU_IDenvironment variable to the desired GPU index (default is 0).export LEROBOT_GPU_ID=0
The GOP (Group of Pictures) size for video encoding can be adjusted by setting the
LEROBOT_GOP_SIZEenvironment variable (default is 30). A smaller GOP size can lead to better video quality but may increase file size. GPU encoding requires the GOP size to be a multiple of the FPS.export LEROBOT_GOP_SIZE=30
Application Features
The Trossen AI Data Collection UI offers a variety of features designed to simplify data collection, task management, and monitoring during robotic experiments.
Task Management
Task Names: Select predefined tasks from a dropdown menu, making it easy to start data collection for specific robotic tasks.
Episodes: Specify the number of episodes for the current task using the spin box. You can increase or decrease the count using the + and - buttons.
Recording Controls
Start Recording: Initiates the data collection for the selected task, beginning the recording of robot actions.
Stop Recording: Ends the current data collection session.
Re-Record: Enables the user to re-record the current episode in case of any errors during data collection, so bad episodes can be skipped and the dataset stays clean.
Progress Tracking
The GUI includes a progress bar that tracks the data collection session in real-time, displaying the percentage of completion.
Camera Views
Live Camera Feeds: You can view multiple camera angles at once while recording, making it easy to monitor the robotic arms and their surroundings as things happen.
Configuration Management
Edit Robot Configuration: The robot’s YAML settings (like camera serial numbers and arm IP addresses) can be easily updated through the GUI, giving users detailed control over the robot’s configuration.
Edit Task Configuration: Task-specific parameters can be adjusted via a YAML editor to tailor the task according to experiment requirements.
Quit Button
The application features a Quit button in the menu that lets you exit safely, making sure all your data is saved and everything shuts down properly.
Troubleshooting
Arms Jittering
If you encounter any issues while using the Trossen AI Data Collection UI that result in jitter or lag in the arms, consider the following troubleshooting steps:
Check System Resources
Ensure that your system has sufficient CPU and memory resources available. Close any unnecessary applications that may be consuming resources.
Explicitly Set Camera Interface to opencv
If you are using Intel RealSense cameras and experience lag, try changing the camera interface to opencv in the robot configuration YAML file.
This can help reduce latency associated with the RealSense SDK.
Adjust min_time_to_move_multiplier
If the arms are moving too fast or jerkily, consider adjusting the min_time_to_move_multiplier in the robot configuration YAML file.
A smaller value can lead to faster movements, while a larger value can result in smoother but slower motions.
Disable Active UI Updates
If you notice significant lag during data collection, try enabling the disable_active_ui_updates option in the task configuration YAML file.
This can help improve performance by reducing the load on the GUI during recording.
Disable Camera Views
If the camera views are causing lag, consider disabling them temporarily to see if performance improves.
This just disables the camera feeds in the GUI but does not affect data collection.
Make the display_fps parameter 0 to disable camera updates in the UI.
Changelog
1.2.0
Separated display FPS from control loop FPS with intelligent frame skipping and a configurable
display_fpsparameter (default 1 FPS), preventing camera UI updates from degrading control loop stability and responsiveness during recording while reducing UI overhead.Moved RGB-to-BGR color space conversion from the time-critical control loop thread to the UI rendering thread, reducing control loop workload and improving real-time control performance.
Environment reset now runs asynchronously, allowing video encoding operations to happen in parallel with other tasks instead of blocking the UI, significantly reducing idle wait time between episodes and improving overall recording throughput.
Throttled progress bar updates during batch saves and long operations to prevent excessive UI redraws that could cause control FPS drops.
Logs now display as formatted HTML with proper text colors instead of raw ANSI escape codes, improving readability in the log viewer with enhanced phase logging and clearer status messages during warmup, reset, saving, and completion phases.
Optimized log message appending by avoiding expensive full-document reads on each new log entry, eliminating UI lag during verbose logging operations, with a configurable log entry limit (default 20 entries) and automatic pruning to prevent unbounded memory growth.
Camera layout reorganized with dynamic camera name labels displayed above each feed for easier identification, improved structure, and proper resource cleanup before hardware resets to avoid camera hardware conflicts and lock-ups.
Dedicated “RESET ARMS” and “HARDWARE RESET CAMERAS” buttons replacing the previous checkbox-based camera feed control for clearer, more intuitive operation of hardware reset functions.
30-second robot connection timeout to prevent indefinite hangs during robot initialization and startup, providing faster failure detection, with improved error handling and automatic restoration of UI elements (buttons, progress bars, controls) to their correct states after failures.
Automatic teleoperation enablement check before each episode to ensure robots requiring explicit teleop mode are properly configured before recording begins.
Episode numbering now correctly accounts for unsaved batched episodes, preventing incorrect episode counts when using batch save intervals.
Re-record button is now only enabled during active recording sessions to prevent accidental activation outside of valid recording contexts.
Added F11 keyboard shortcut for full-screen toggle, allowing users to easily move the application window between displays and maximize screen usage on touchscreen displays.