ROS 2 Controllers Configuration
 View Package on GitHub
Overview
This package provides the necessary ROS controllers needed to get MoveIt to control any physical Interbotix X-Series arm. It essentially takes in Joint Trajectory commands from MoveIt (via the FollowJointTrajectoryAction interface) and then publishes joint commands at the right time to the xs_sdk node. Currently, only the ‘position’ values in the Joint Trajectory messages are used since that provides the smoothest motion. Note that while this package is really only meant to be used with MoveIt, it could technically be used with any other node that can interface properly with the joint_trajectory_controller package.
Structure
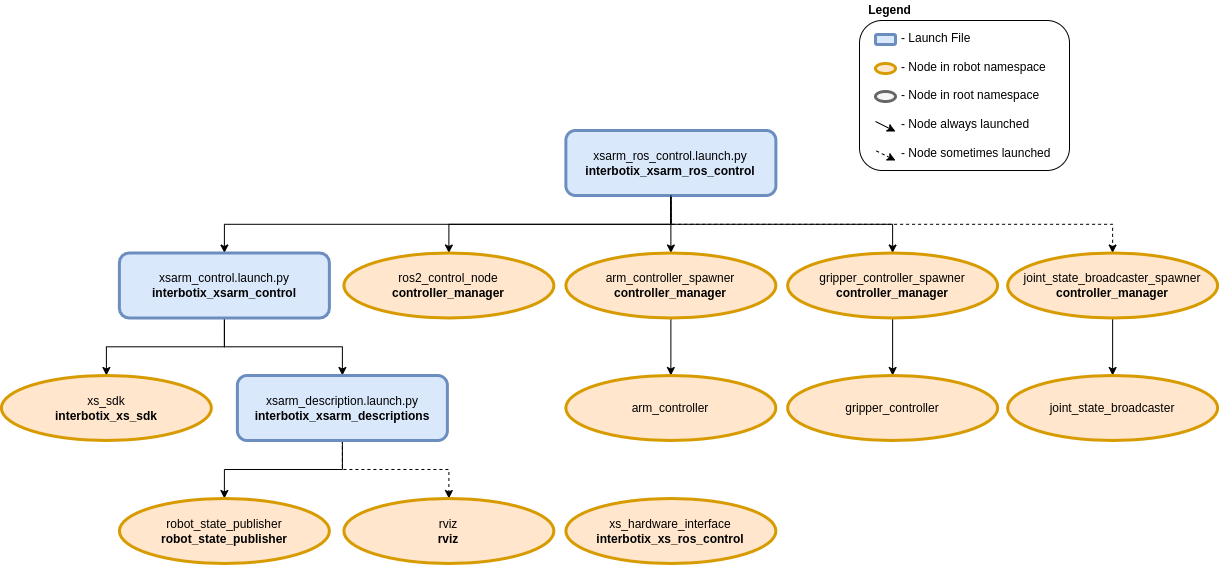
As explained in the Overview, this package builds on top of the interbotix_xsarm_control package (which starts the xs_sdk node), and is typically used in conjunction with the interbotix_xsarm_moveit package. To get familiar with the nodes in those packages, feel free to look at their documentation. The other nodes are described below:
- controller_manager - responsible for loading and starting a set of controllers at once, as well as automatically stopping and unloading those same controllers
- spawner - responsible for spawning each controller; in this case, three spawners are loaded, one for the arm_controller, one for the gripper_controller, and if using fake hardware, one for a joint_state_broadcaster
- xs_hardware_interface - receives joint commands from the ROS controllers and publishes them to the correct topics (subscribed to by the xs_sdk node) at the appropriate times
Usage
This package is not meant to be used by itself but included in a launch file within your custom ROS package (which should expose a FollowJointTrajectoryAction interface).
To run this package, enter the command below in a terminal (assuming a PincherX-150 is being launched).
$ ros2 launch interbotix_xsarm_ros_control xsarm_ros_control.launch.py robot_model:=px150
This is the bare minimum needed to get up and running. Take a look at the table below to see how to further customize with other launch file arguments.
| Argument | Description | Default | Choices |
|---|---|---|---|
| robot_model | model type of the Interbotix Arm such as ‘wx200’ or ‘rx150’. | px100, px150, rx150, rx200, wx200, wx250, wx250s, vx250, vx300, vx300s, mobile_px100, mobile_wx200, mobile_wx250s |
|
| robot_name | name of the robot (typically equal to robot_model, but could be anything). |
LaunchConfig(robot_model) |
|
| use_rviz | launches RViz if set to true. |
false |
|
| mode_configs | the file path to the ‘mode config’ YAML file. | LocalVar(‘FindPackageShare(pkg= interbotix_xsarm_ros_control) + ‘config’ + ‘modes.yaml’’) |
|
| use_sim_time | tells ROS nodes asking for time to get the Gazebo-published simulation time, published over the ROS topic /clock; this value is automatically set to true if using Gazebo hardware. |
false |
true, false |
| base_link_frame | name of the ‘root’ link on the arm; typically base_link, but can be changed if attaching the arm to a mobile base that already has a base_link frame. |
base_link |
|
| use_gripper | if true, the default gripper is included in the robot_description parameter; if false, it is left out; set to false if not using the default gripper. |
true |
true, false |
| show_ar_tag | if true, the AR tag mount is included in the robot_description parameter; if false, it is left out; set to true if using the AR tag mount in your project. |
false |
true, false |
| show_gripper_bar | if true, the gripper_bar link is included in the robot_description parameter; if false, the gripper_bar and finger links are not loaded. Set to false if you have a custom gripper attachment. |
true |
true, false |
| show_gripper_fingers | if true, the gripper fingers are included in the robot_description parameter; if false, the gripper finger links are not loaded. Set to false if you have custom gripper fingers. |
true |
true, false |
| use_world_frame | set this to true if you would like to load a ‘world’ frame to the robot_description parameter which is located exactly at the ‘base_link’ frame of the robot; if using multiple robots or if you would like to attach the ‘base_link’ frame of the robot to a different frame, set this to false. |
true |
true, false |
| external_urdf_loc | the file path to the custom urdf.xacro file that you would like to include in the Interbotix robot’s urdf.xacro file. | ‘’ | |
| hardware_type | configures the robot_description parameter to use the actual hardware, fake hardware, or hardware simulated in Gazebo. |
actual |
actual, fake, gz_classic |
| robot_description | URDF of the robot; this is typically generated by the xacro command. | Command(FindExec(xacro) + ‘ ‘ + LocalVar(‘FindPackageShare(pkg= interbotix_xsarm_descriptions) + ‘urdf’ + LaunchConfig(robot_model)’) + ‘.urdf.xacro ‘ + ‘robot_name:=’ + LaunchConfig(robot_name) + ‘ ‘ + ‘base_link_frame:=’ + LaunchConfig(base_link_frame) + ‘ ‘ + ‘use_gripper:=’ + LaunchConfig(use_gripper) + ‘ ‘ + ‘show_ar_tag:=’ + LaunchConfig(show_ar_tag) + ‘ ‘ + ‘show_gripper_bar:=’ + LaunchConfig(show_gripper_bar) + ‘ ‘ + ‘show_gripper_fingers:=’ + LaunchConfig(show_gripper_fingers) + ‘ ‘ + ‘use_world_frame:=’ + LaunchConfig(use_world_frame) + ‘ ‘ + ‘external_urdf_loc:=’ + LaunchConfig(external_urdf_loc) + ‘ ‘ + ‘hardware_type:=’ + LaunchConfig(hardware_type) + ‘ ‘) |