Record And Playback
 View Package on GitHub
Overview
Imagine that you would like to have the robot arm perform some motions to achieve a specific task. One way of doing this would be to create a JointTrajectory of desired joint positions at specific times which you could then command the robot. Alternatively (and much less time consuming), you could manually manipulate the arm to do the specific motions and record them in a ROS bag file. Then, you could ‘play back’ the bag file as many times as you like to repeat the motions on the same robot later. This ‘record/playback’ feature is made possible by the xsarm_puppet_single.
Structure
As shown below, the interbotix_xsarm_puppet package builds on top of the interbotix_xsarm_control package. To get familiar with that package, please look at its README. The nodes specific to this package are described below.
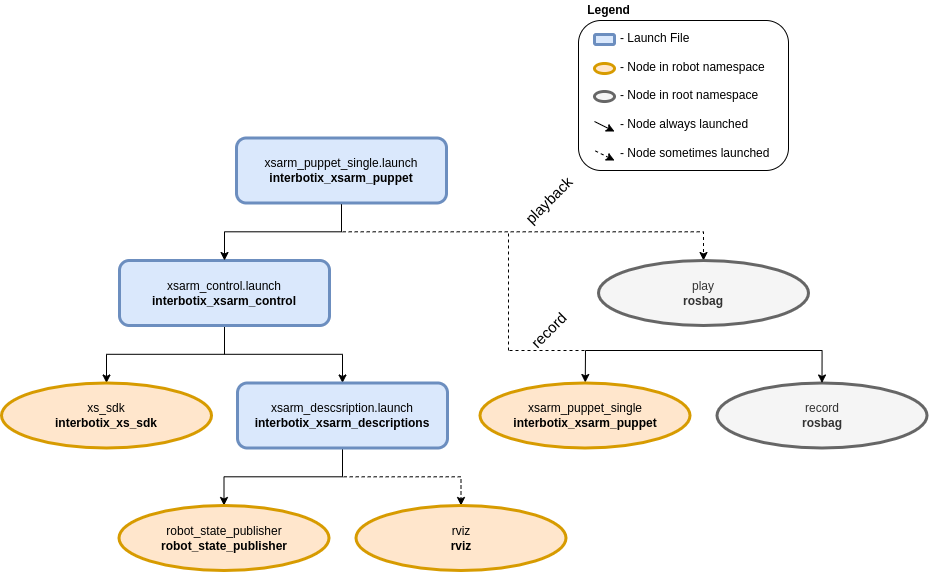
The above diagram shows the structure for the ‘record/playback’ feature. The two nodes involved are:
- xsarm_puppet_single - responsible for reading the arm’s current joint states and publishing them as position commands to the
/<robot_name>/commands/joint_groupand/<robot_name>/commands/joint_singletopics. Conveniently, as the arm is torqued off so that the user can manipulate it, the joints will not act upon these commands - record - responsible for recording the two topics mentioned above in a bag file so that they can be played back later
- play - responsible for playing back the bag file mentioned above with the arm in a torqued on state; the playback is delayed 3 seconds to give time for the xs_sdk node to load
Usage
To record joint commands while manipulating a single robot (let’s say the PincherX-150), type the following in a terminal:
$ ros2 launch interbotix_xsarm_puppet xsarm_puppet_single.launch.py robot_model:=px150 record_or_playback:=record
Once the nodes finish launching, manually manipulate the arm and gripper through your desired motions. When done, return the robot to its initial starting position and Ctrl + C the nodes so that rosbag stops recording. By default, the bag file will be saved in the bag directory. To playback the motion, type the following in the terminal:
$ ros2 launch interbotix_xsarm_puppet xsarm_puppet_single.launch.py robot_model:=px150 record_or_playback:=playback
If you specified a custom bag file name, make sure to include the name in the above command as well. When the bag file finishes playing, you can restart it by navigating to the directory where the bag file is located and in a terminal, type:
$ ros2 bag play </path/to/bag>
The robot should now repeat the motions. When done, Ctrl + C to stop all nodes. To see other command line arguments for the ‘xsarm_puppet_single.launch.py’ file, refer to the table below.
| Argument | Description | Default | Choices |
|---|---|---|---|
| robot_model | model type of the Interbotix Arm such as wx200 or rx150. |
px100, px150, rx150, rx200, wx200, wx250, wx250s, vx250, vx300, vx300s, mobile_px100, mobile_wx200, mobile_wx250s, aloha_wx250s, aloha_vx300s |
|
| robot_name | name of the robot (typically equal to robot_model, but could be anything). |
LaunchConfig(robot_model) |
|
| use_rviz | launches RViz if set to true. |
true |
true, false |
| record_or_playback | ‘record’ to record joint commands while physically manipulating the arm to a bagfile or ‘playback’ to play-back joint commands from a bagfile to a torqued on arm. | record, playback |
|
| bag_name | Desired ROS bag file name. | LaunchConfig(robot_name) + ‘_commands’ |
|
| launch_driver | true if xsarm_control should be launched - set to false if you would like to run your own version of this file separately. |
true |
true, false |
| xs_driver_logging_level | set the logging level of the X-Series Driver. | INFO |
DEBUG, INFO, WARN, ERROR, FATAL |
| use_sim | if true, the DYNAMIXEL simulator node is run; use RViz to visualize the robot’s motion; if false, the real DYNAMIXEL driver node is run. |
false |
true, false |
| base_link_frame | name of the ‘root’ link on the arm; typically base_link, but can be changed if attaching the arm to a mobile base that already has a base_link frame. |
base_link |
|
| use_gripper | if true, the default gripper is included in the robot_description; if false, it is left out; set to false if not using the default gripper. |
true |
true, false |
| show_ar_tag | if true, the AR tag mount is included in the robot_description; if false, it is left out; set to true if using the AR tag mount in your project. |
false |
true, false |
| show_gripper_bar | if true, the gripper_bar link is included in the robot_description; if false, the gripper_bar and finger links are not loaded. Set to false if you have a custom gripper attachment. |
true |
true, false |
| show_gripper_fingers | if true, the gripper fingers are included in the robot_description; if false, the gripper finger links are not loaded. Set to false if you have custom gripper fingers. |
true |
true, false |
| use_world_frame | set this to true if you would like to load a ‘world’ frame to the robot_description which is located exactly at the ‘base_link’ frame of the robot; if using multiple robots or if you would like to attach the ‘base_link’ frame of the robot to a different frame, set this to false. |
true |
true, false |
| external_urdf_loc | the file path to the custom urdf.xacro file that you would like to include in the Interbotix robot’s urdf.xacro file. | ‘’ | |
| hardware_type | configures the robot_description to use the actual hardware, fake hardware, or hardware simulated in Gazebo. |
actual |
actual, fake, gz_classic |
| robot_description | URDF of the robot; this is typically generated by the xacro command. | Command(FindExec(xacro) + ‘ ‘ + LocalVar(‘FindPackageShare(pkg= interbotix_xsarm_descriptions) + ‘urdf’ + LaunchConfig(robot_model)’) + ‘.urdf.xacro ‘ + ‘robot_name:=’ + LaunchConfig(robot_name) + ‘ ‘ + ‘base_link_frame:=’ + LaunchConfig(base_link_frame) + ‘ ‘ + ‘use_gripper:=’ + LaunchConfig(use_gripper) + ‘ ‘ + ‘show_ar_tag:=’ + LaunchConfig(show_ar_tag) + ‘ ‘ + ‘show_gripper_bar:=’ + LaunchConfig(show_gripper_bar) + ‘ ‘ + ‘show_gripper_fingers:=’ + LaunchConfig(show_gripper_fingers) + ‘ ‘ + ‘use_world_frame:=’ + LaunchConfig(use_world_frame) + ‘ ‘ + ‘external_urdf_loc:=’ + LaunchConfig(external_urdf_loc) + ‘ ‘ + ‘hardware_type:=’ + LaunchConfig(hardware_type) + ‘ ‘) |