openpi
Warning
This is an experimental tutorial and may change in the future. Minimal testing has been done on the Trossen AI setup. Results may vary.
This guide walks through the use of the openpi framework with Trossen AI arms.
Background and Disclaimers
Refer to the following papers to understand the model architecture and training procedure:
Look into the limitations section for known issues and challenges. As mentioned in the paper, high-quality datasets are required to get good results.
“Our experiments imply that an analogous phenomenon might take place with robot foundation models, where pre-trained models have some zero-shot capabilities, but complex tasks like laundry following require fine-tuning with high-quality data. Training on only this high-quality data results in a brittle model that does not reliably recover from mistakes, while running the pre-trained model in zero shot does not always exhibit the fluent strategies demonstrated in the post-training data.”
The paper also mentions its experimental setup and success results, which can be used as a reference for your own experiments. One such setup is mentioned as follows:
“Shirt folding: Shirt folding is recorded as either success or failure. We begin each shirt folding eval by laying the shirt flat on the table. Success is defined as having folded in the sleeves and performed one half-fold along the length of the shirt. Our eval includes 4 small t-shirts and 1 medium t-shirt. We run 2 evals for each item for a maximum of 15000 steps or approximately 5 minutes each.””
The following figure presents the the results from the original paper, showing average scores per task over 10 trials. The scoring rubrics are mentioned in the paper appendix. A score of 1.0 represents a perfect execution, while partial scores correspond to partially completed tasks (e.g., 0.5 for a shirt that is half-folded).
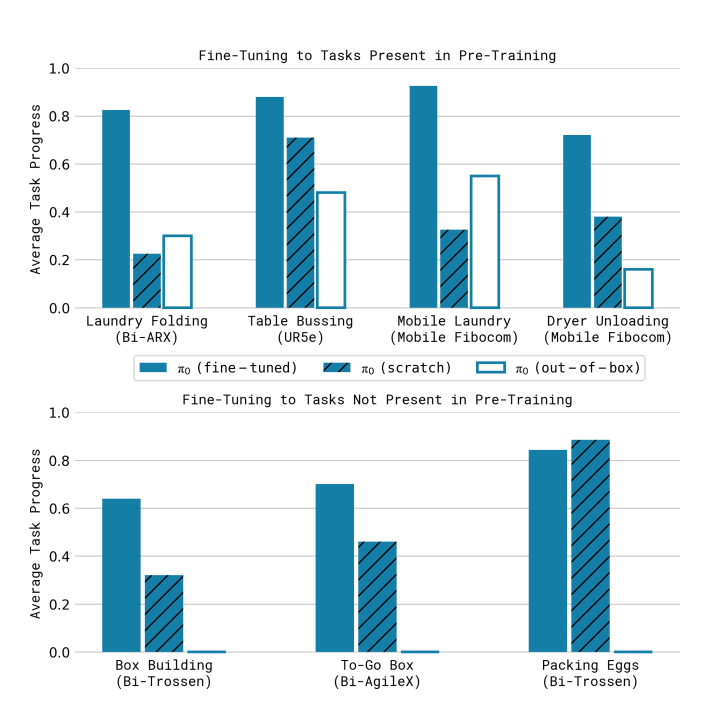
The original π0 results are provided here to set expectations. Since Trossen AI arms were not part of the original π0 training dataset, performance may be weaker out of the box. However, we found that fine-tuning on a small, high-quality dataset can still yield useful performance. See the Results section of this guide for details.
This tutorial walks you through:
Collecting episodes
Training with OpenPi
Fine-tuning using LoRA
Evaluating policies
Running inference
Note
This workflow uses three different versions of LeRobot for different stages:
Data Collection: LeRobot v2.1 (
Interbotix/lerobot) - Collects episodes in LeRobot Dataset v2 formatTraining: LeRobot v0.1.0 (OpenPI dependency) - Compatible with LeRobot Dataset v2 format for training
Inference: LeRobot v0.4.0 - Uses the hardware plugin system and is independent of dataset format
Installation Locations:
LeRobot v0.1.0 (training) is installed at
.venv/lib/python3.11/site-packages/lerobotLeRobot v0.4.0 (inference) is installed at
examples/trossen_ai/.venv/lib/python3.11/site-packages/lerobot
Where to Run Commands:
Training commands: Run from the project root (uses LeRobot v0.1.0)
Inference commands: Run from
examples/trossen_aidirectory (uses LeRobot v0.4.0)
This setup works because uv manages dependencies in isolated virtual environments for each project.
The LeRobot BYOH Hardware Plugin source code for integrating Trossen AI arms (including BiWidowXAIFollower support) is available at: TrossenRobotics/lerobot_trossen - main
Collect Episodes using LeRobot
We collect episodes using Interbotix/lerobot (LeRobot v2.1). For more information on installation and recording episodes check the following:
Note
We use Interbotix/lerobot (LeRobot v2.1) for data collection because it saves episodes in the LeRobot Dataset v2 format.
This Dataset v2 format is compatible with OpenPI’s training scripts, which use LeRobot v0.1.0.
Newer dataset formats (v3.0+) have breaking changes that are not compatible with OpenPI’s training pipeline.
Version Summary:
LeRobot v2.1 → Produces Dataset v2 format → Compatible with OpenPI training (LeRobot v0.1.0)
Here is a recorded dataset using the above instructions:
You can also visualize the dataset using the following link. Just paste the dataset name in the input box.
Visualize using the HuggingFace visualize_dataset space
Or you can also visualize it locally using LeRobot:
Visualize using Visualize
Install UV
Install uv for dependency management.
openpi Setup
Clone the repo and update its submodules:
git clone --recurse-submodules https://github.com/TrossenRobotics/openpi.git

# Or if you already cloned the repo:
git submodule update --init --recursive
We use uv to manage Python dependencies. Once uv is installed, run the following to set up the environment:
GIT_LFS_SKIP_SMUDGE=1 uv sync
GIT_LFS_SKIP_SMUDGE=1 uv pip install -e .
Note
GIT_LFS_SKIP_SMUDGE=1 is needed to pull LeRobot as a dependency.
Training
Before you can train on your recorded dataset, you must create a custom training configuration. There are no pre-configured options for custom datasets - each dataset requires its own configuration.
Creating a Custom Training Configuration
To train on your dataset, you need to add a custom training configuration to the openpi/src/training/config.py file.
This configuration defines the model parameters, dataset source, camera mappings, prompts, and training options specific to your dataset.
Key Configuration Parameters:
name: A unique identifier for your training configuration (used when running the training command)
repo_id: The HuggingFace dataset repository ID. Datasets are automatically downloaded from HuggingFace on first use and cached locally in
~/.cache/huggingface/lerobot/<your_huggingface_id>/default_prompt: The text prompt describing the task (used during training and inference)
repack_transforms: Maps your dataset’s camera and observation names to the π0 model’s expected input names
num_train_steps: Total number of training iterations
batch_size: Number of samples per training batch (adjust based on GPU memory)
Dataset Location:
Remote datasets: If you specify a HuggingFace
repo_id, the dataset will be automatically downloaded to~/.cache/huggingface/lerobot/<your_huggingface_id>/the first time you run trainingLocal datasets: To use a local dataset, you can push it to HuggingFace first using
huggingface-cli uploador modify the data loader to point to a local directory
Below is an example configuration for training on the Trossen AI dataset. You must customize these parameters for your specific dataset:
Note
The camera mapping are used to map the camera names in the dataset to the expected input names for the π0 model.
In this example the dataset has 4 cameras: top, bottom, left and right.
We map them to the expected input names of the model: cam_high, cam_low, cam_left_wrist and cam_right_wrist.
TrainConfig(
    name="pi0_trossen_transfer_block",
    model=pi0_config.Pi0Config(paligemma_variant="gemma_2b_lora", action_expert_variant="gemma_300m_lora"),
    data=LeRobotAlohaDataConfig(
        use_delta_joint_actions=False,
        adapt_to_pi=False,
        repo_id="TrossenRoboticsCommunity/bimanual-widowxai-handover-cube",
        assets=AssetsConfig(
            assets_dir="gs://openpi-assets/checkpoints/pi0_base/assets",
            asset_id="trossen",
        ),
        default_prompt="grab and handover the red cube",
        repack_transforms=_transforms.Group(
            inputs=[
                _transforms.RepackTransform(
                    {
                        "images": {
                            "cam_high": "observation.images.top",
                            "cam_left_wrist": "observation.images.left",
                            "cam_right_wrist": "observation.images.right",
                        },
                        "state": "observation.state",
                        "actions": "action",
                    }
                )
            ]
        ),
    ),
    weight_loader=weight_loaders.CheckpointWeightLoader("gs://openpi-assets/checkpoints/pi0_base/params"),
    num_train_steps=20_000,
    batch_size=2,
    freeze_filter=pi0_config.Pi0Config(
        paligemma_variant="gemma_2b_lora", action_expert_variant="gemma_300m_lora"
    ).get_freeze_filter(),
    # Turn off EMA for LoRA finetuning.
    ema_decay=None,
)
TrainConfig(
    name="pi05_trossen_transfer_block",
    model=pi0_config.Pi0Config(pi05=True),
    data=LeRobotAlohaDataConfig(
        use_delta_joint_actions=False,
        adapt_to_pi=False,
        repo_id="TrossenRoboticsCommunity/bimanual-widowxai-handover-cube",
        assets=AssetsConfig(
            assets_dir="gs://openpi-assets/checkpoints/pi05_base/assets",
            asset_id="trossen",
        ),
        default_prompt="grab and handover the red cube",
        repack_transforms=_transforms.Group(
            inputs=[
                _transforms.RepackTransform(
                    {
                        "images": {
                            "cam_high": "observation.images.top",
                            "cam_left_wrist": "observation.images.left",
                            "cam_right_wrist": "observation.images.right",
                        },
                        "state": "observation.state",
                        "actions": "action",
                    }
                )
            ]
        ),
    ),
    weight_loader=weight_loaders.CheckpointWeightLoader("gs://openpi-assets/checkpoints/pi05_base/params"),
    num_train_steps=80_000,
    batch_size=8,
)
We train using the task prompt provided in the dataset instead of a default prompt. This prompt is prepended to the model input during training.
TrainConfig(
     name="pi05_trossen_multitask_training",
     model=pi0_config.Pi0Config(pi05=True),
     data=LeRobotAlohaDataConfig(
         use_delta_joint_actions=False,
         adapt_to_pi=False,
         repo_id="TrossenRoboticsCommunity/trossen_ai_stationary_organize_tools",
         base_config=DataConfig(prompt_from_task=True),
         assets=AssetsConfig(
             assets_dir="gs://openpi-assets/checkpoints/pi05_base/assets",
             asset_id="trossen",
         ),
         repack_transforms=_transforms.Group(
             inputs=[
                 _transforms.RepackTransform(
                     {
                         "images": {
                             "cam_high": "observation.images.cam_high",
                             "cam_left_wrist": "observation.images.cam_left_wrist",
                             "cam_right_wrist": "observation.images.cam_right_wrist",
                             "cam_low": "observation.images.cam_low",
                         },
                         "state": "observation.state",
                         "actions": "action",
                         "prompt": "prompt",
                     }
                 )
             ]
         ),
     ),
     weight_loader=weight_loaders.CheckpointWeightLoader("gs://openpi-assets/checkpoints/pi05_base/params"),
     num_train_steps=100_000,
     batch_size=2,
     freeze_filter=pi0_config.Pi0Config(
         paligemma_variant="gemma_2b_lora", action_expert_variant="gemma_300m_lora"
     ).get_freeze_filter(),
     # Turn off EMA for LoRA finetuning.
     ema_decay=None,
     save_interval=5000,
 )
Running the Training Command
After adding your custom configuration to openpi/src/training/config.py, you can start training.
Run this command from the project root:
cd openpi
XLA_PYTHON_CLIENT_MEM_FRACTION=0.9 uv run scripts/train.py <your_custom_config_name> \
    --exp-name=my_experiment \
    --overwrite
Command Arguments Explained:
XLA_PYTHON_CLIENT_MEM_FRACTION=0.9: Environment variable that limits JAX/XLA GPU memory usage to 90% of available VRAM.
<your_custom_config_name>: Replace with the
namefield from yourTrainConfig(e.g.,pi0_trossen_transfer_block)–exp-name: A friendly name for this training run. Checkpoints will be saved to
checkpoints/<exp-name>/–overwrite: If a checkpoint directory with the same name exists, overwrite it. Remove this flag if you want to resume training from an existing checkpoint.
We trained on a RTX5090 and fine-tuned using LoRA.
Note
LoRA (Low-Rank Adaptation) is a technique for fine-tuning large pre-trained models efficiently. Instead of updating all model parameters, LoRA inserts small, trainable matrices (low-rank adapters) into certain layers (usually linear layers like attention projections). This drastically reduces the number of trainable parameters while keeping most of the model frozen.
We have also seen that a higher batch_size (e.g. 8) yields better results than a lower batch_size (e.g. 4).
Checkpoints
Checkpoints are stored in the checkpoints folder at the root of your project directory.
To use a pretrained policy, download and extract the following checkpoint into your checkpoints directory:
Running Inference with Your Trained Policy
Once training is complete and your checkpoint is ready, you can start the policy server and run the client.
Start the Policy Server
Launch the policy server using your trained checkpoint and configuration:
uv run scripts/serve_policy.py policy:checkpoint \
    --policy.config=pi0_trossen_transfer_block \
    --policy.dir=checkpoints/pi0_trossen_transfer_block/test_pi0_finetuning/19999
Start the Client
Note
The client script requires the latest version of LeRobot, while the openpi repository depends on an older version for data loading.
To prevent version conflicts, the trossen_ai package uses the TrossenRobotics/lerobot_trossen repository as its dependency.
When using uv for package management, this setup creates a separate virtual environment for trossen_ai.
If you need to modify any LeRobot packages, ensure you are editing them in the correct environment.
Before running the client, make sure that your Trossen AI arms and cameras are properly set up and connected to your network. You can edit the camera and arm IP address configuration directly in the script:
bi_widowx_ai_config = BiWidowXAIFollowerConfig(
    left_arm_ip_address="192.168.1.5",
    right_arm_ip_address="192.168.1.4",
    min_time_to_move_multiplier=4.0,
    id="bimanual_follower",
    cameras={
        "cam_high": RealSenseCameraConfig(
            serial_number_or_name="218622270304",
            width=640, height=480, fps=30, use_depth=False
        ),
        "cam_low": RealSenseCameraConfig(
            serial_number_or_name="130322272628",
            width=640, height=480, fps=30, use_depth=False
        ),
        "cam_right_wrist": RealSenseCameraConfig(
            serial_number_or_name="128422271347",
            width=640, height=480, fps=30, use_depth=False
        ),
        "cam_left_wrist": RealSenseCameraConfig(
            serial_number_or_name="218622274938",
            width=640, height=480, fps=30, use_depth=False
        ),
    }
)
The client script provides parameters to control both the rate of inference and temporal ensembling.
The rate of inference determines how often the policy is queried for new actions. Since each query is computationally expensive, frequent queries reduce the control frequency to around 10 Hz, which can lead to jerky motions. To avoid this, you should choose a rate that balances smoothness and responsiveness.
According to the π0 paper, the control loop runs at 50 Hz, with inference every 0.5 s (after 25 actions).
In our case, the control loop runs at 30 Hz to align with the camera frame rate.
Practical trade-offs:
Rate = 50 → smoother motion, less responsive to environment changes.
Rate = 25 → more responsive, but noticeably jerky motion.
Depending on your setup, you may need to adjust this parameter for optimal performance.
self.rate_of_inference = 50 # Number of control steps per policy inference
Temporal ensembling is a technique for smoothing the actions generated by the policy. It was originally introduced in the ACT paper, and later mentioned in the π0 paper.
While simple to implement, the π0 appendix notes that temporal ensembling can actually hurt performance.
Our own experiments confirmed this. We observed no benefit, so by default the temporal ensembling weight is set to None.
That said, we have included an implementation of temporal ensembling in the client script for users who wish to experiment with it.
self.m = None # Temporal ensembling weight (None = no ensembling)
Run the client to interact with the policy server:
cd examples/trossen_ai
uv run main.py \
    --mode autonomous \
    --task_prompt "grab red cube"
Results
Here are some preliminary results from our experiments with the π0 and π0.5 policy on the bimanual WidowX setup.
The π0 base checkpoint has no episodes collected using Trossen AI arms, so fine tuning is necessary.
We collected a small dataset of 50 episodes (very small compared to other robot modalities).
Zero-shot inference may be difficult as environment changes (color, shape, etc.) affect performance.
Dataset collected in a highly controlled environment.
Results folder: Google Drive
Scenarios:
openpi_trossen_ai_red_block [success]: Robot successfully picks up and transfers red block in second try.openpi_trossen_ai_blue_lego [fail]: Robot fails due to different block size and color.openpi_trossen_ai_environment_disturbances [fail]: Robot struggles under disturbances.openpi_trossen_ai_wooden_block [fail]: Robot fails with wooden block, poor generalization.openpi_trossen_ai_pi05_red_block [success]: π0.5 model successfully picks up and transfers red block on first try.
We used the same command for all tests:
uv run main.py \
    --mode autonomous \
    --task_prompt "grab red cube"
If you want to run the client in test mode (no movement, just logs the actions that would be taken), you can use the following command:
uv run main.py \
    --mode test \
    --task_prompt "grab red cube"