Trossen AI Configuration
In order to use the Trossen AI Kits with LeRobot, you need to identify specifications for your setup.
The specifications include the IP address, model_name, and camera serial numbers.
we will pass the specifications in as arguments using --robot.ip_address, --robot.type, and --robot.cameras.
The following steps will guide you on how to configure the Trossen AI Kits with LeRobot.
The configuration File for the follower arm for the Trossen AI Kits with LeRobot can be found in lerobot_trossen/packages/lerobot_robot_trossen/src/lerobot_robot_trossen.
The configuration File for the leader arm for the Trossen AI Kits with LeRobot can be found in lerobot_trossen/packages/lerobot_teleoperation_trossen/src/lerobot_teleoperation_trossen.
@RobotConfig.register_subclass("widowxai_follower_robot")
@dataclass
class WidowXAIFollowerConfig(RobotConfig):
    # IP address of the arm
    ip_address: str

    # `max_relative_target` limits the magnitude of the relative positional target vector for
    # safety purposes. Set this to a positive scalar to have the same value for all motors, or a
    # list that is the same length as the number of motors in your follower arms.
    max_relative_target: float | None = 5.0

    # Multiplier for computing minimum time (in seconds) for the arm to reach a target position.
    # The final goal time is computed as: min_time_to_move = multiplier / fps.
    # A smaller multiplier results in faster (but potentially jerky) motion.
    # A larger multiplier results in smoother motion but with increased lag.
    # A recommended starting value is 3.0.
    min_time_to_move_multiplier: float = 3.0

    # Control loop rate in Hz
    loop_rate: int = 30

    # cameras
    cameras: dict[str, CameraConfig] = field(default_factory=dict)
    # Troubleshooting: If one of your IntelRealSense cameras freeze during
    # data recording due to bandwidth limit, you might need to plug the camera
    # on another USB hub or PCIe card.

    # Joint names for the WidowX AI follower arm
    joint_names: list[str] = field(
        default_factory=lambda: [
            "joint_0",
            "joint_1",
            "joint_2",
            "joint_3",
            "joint_4",
            "joint_5",
            "left_carriage_joint",
        ]
    )

    # "Staged" positions in rad for the arm and m for the gripper
    #
    # The robot will move to these positions when first started and before the arm is sent to the
    # sleep position.
    staged_positions: list[float] = field(
        default_factory=lambda: [0, np.pi / 3, np.pi / 6, np.pi / 5, 0, 0, 0]
    )
@RobotConfig.register_subclass("bi_widowxai_follower_robot")
@dataclass
class BiWidowXAIFollowerRobotConfig(RobotConfig):
    # IP address of the arms
    left_arm_ip_address: str
    right_arm_ip_address: str

    # `max_relative_target` limits the magnitude of the relative positional target vector for
    # safety purposes. Set this to a positive scalar to have the same value for all motors, or a
    # list that is the same length as the number of motors in your follower arms.
    left_arm_max_relative_target: float | None = None
    right_arm_max_relative_target: float | None = None

    # Multiplier for computing minimum time (in seconds) for the arm to reach a target position.
    # The final goal time is computed as: min_time_to_move = multiplier / fps.
    # A smaller multiplier results in faster (but potentially jerky) motion.
    # A larger multiplier results in smoother motion but with increased lag.
    # A recommended starting value is 3.0.
    # This value is shared between both arms.
    min_time_to_move_multiplier: float = 3.0

    # Expected control loop rate in Hz (shared between both arms).
    loop_rate: int = 30

    # cameras (shared between both arms)
    cameras: dict[str, CameraConfig] = field(default_factory=dict)
@RobotConfig.register_subclass("mobileai_robot")
@dataclass
class MobileAIRobotConfig(BiWidowXAIFollowerRobotConfig):
    # Mobile AI uses the same configuration as BiWidowXAIFollowerRobotConfig.
    # The base of the kit does not require any configuration parameters.
    enable_base_motor_torque: bool = False
@TeleoperatorConfig.register_subclass("widowxai_leader_teleop")
@dataclass
class WidowXAILeaderTeleopConfig(TeleoperatorConfig):
    # IP address of the arm
    ip_address: str

    # Joint names for the WidowX AI leader arm
    joint_names: list[str] = field(
        default_factory=lambda: [
            "joint_0",
            "joint_1",
            "joint_2",
            "joint_3",
            "joint_4",
            "joint_5",
            "left_carriage_joint",
        ]
    )

    # "Staged" positions in rad for the arm and m for the gripper
    #
    # The robot will move to these positions when first started and before the arm is sent to the
    # sleep position.
    staged_positions: list[float] = field(
        default_factory=lambda: [0, np.pi / 3, np.pi / 6, np.pi / 5, 0, 0, 0]
    )
@TeleoperatorConfig.register_subclass("bi_widowxai_leader_teleop")
@dataclass
class BiWidowXAILeaderRobotConfig(TeleoperatorConfig):
    left_arm_ip_address: str
    right_arm_ip_address: str
@TeleoperatorConfig.register_subclass("mobileai_leader_teleop")
@dataclass
class MobileAILeaderTeleopConfig(BiWidowXAILeaderRobotConfig):
    # Mobile AI uses the same configuration as BiWidowXAILeaderRobotConfig.
    pass
Setup IP Address
Note
By default, the IP address for a Trossen AI arm is set to 192.168.1.2.
Make sure to change the IP addresses of your Trossen AI arms to match the ones that will be passed in the arguments.
To set up the IP address for the Trossen AI Arms, you must first ensure that the arms are connected to the same network as your computer. Refer to Arm Network Setup for correct connection instructions. Once connected, you can find or configure the IP address using the configure_cleanup demo or the set_ip_method and set_manual_ip demos.
Camera Serial Number
There are two ways to set up the camera serial numbers for the Trossen AI Kits with LeRobot: using the RealSense interface or the OpenCV interface. Based on the camera interface you choose, follow the appropriate steps below to set up the camera serial numbers.
Camera serial numbers are required to uniquely identify each camera connected to your system.
You will pass the cameras as a dictionary argument using --robot.cameras.
The dictionary will look like this for two cameras:
--robot.cameras="{
    cam_main: {type: intelrealsense, serial_number_or_name: "0123456789", width: 640, height: 480, fps: 30},
    cam_wrist: {type: intelrealsense, serial_number_or_name: "0123456789", width: 640, height: 480, fps: 30}
}"
--robot.cameras="{
    cam_main: {type: opencv, index_or_path: 8, width: 640, height: 480, fps: 30},
    cam_wrist: {type: opencv, index_or_path: 10, width: 640, height: 480, fps: 30}
}"
We will look at setting up the specific camera types in more detail below.
Open realsense-viewer
realsense-viewer
Note
If realsense-viewer is not already installed on your machine, follow these steps on the librealsense GitHub repository to install
librealsense2-utils.Plug in a single camera and check the sidebar for its entry. If it does not show up in the side bar, click Add Source and find the Intel RealSense D405 in the drop down.
Note
Troubleshooting: If the camera does not show up in the sidebar after plugging it in, try a hardware reset.
Click on Info for the camera, find the Serial Number, and copy it.
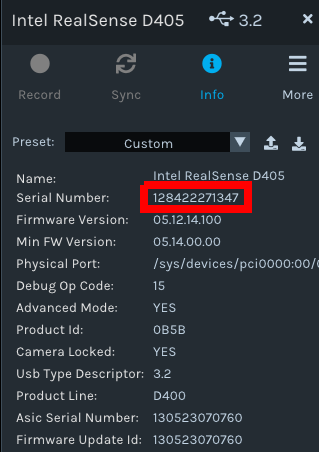
Note
You can also find your cameras using the command
uv run lerobot-find-cameras realsense
--- Detected Cameras ---
Camera #0:
Name: Intel RealSense D405
Type: IntelRealSense
Id: 0123456789
Serial Number: 0123456789
Firmware Version:
Check the saved output in outputs/captured_images to identify which serial number corresponds to which physical camera:
realsense__0123456789.png
[...]
realsense__1123456789.png
realsense__2123456789.png
[...]
realsense__3123456789.png
Put the camera serial number in the appropriate dictionary item as specified above.
Repeat for the rest of the cameras.
Note
For best practices on multi-camera setups, refer to Multi-Camera configurations - D400 Series Stereo Cameras .
The OpenCVCamera class in the original lerobot repository allows you to record frames from most cameras using the opencv2 library. For more details on compatibility, see Video I/O with OpenCV Overview.
To find the camera indices, run the following utility script, which will save a few frames from each detected camera:
uv run lerobot-find-cameras opencv
The output will look something like this if you have two cameras connected:
--- Detected Cameras ---
Camera #0:
Name: OpenCV Camera @ /dev/video10
Type: OpenCV
Id: /dev/video10
Backend api: V4L2
Default stream profile:
    Format: 0.0
    Fourcc: YUYV
    Width: 640
    Height: 480
    Fps: 30.0
--------------------
Camera #1:
Name: OpenCV Camera @ /dev/video14
Type: OpenCV
Id: /dev/video14
Backend api: V4L2
Default stream profile:
    Format: 0.0
    Fourcc: UYVY
    Width: 640
    Height: 480
    Fps: 30.0

[...]
--------------------
Camera #9:
Name: OpenCV Camera @ /dev/video8
Type: OpenCV
Id: /dev/video8
Backend api: V4L2
Default stream profile:
    Format: 0.0
    Fourcc: UYVY
    Width: 640
    Height: 480
    Fps: 30.0
--------------------

Finalizing image saving...
Image capture finished. Images saved to outputs/captured_images
Check the saved images in outputs/captured_images to identify which camera index corresponds to which physical camera (e.g.
0forvideo0or1forvideo1):opencv__dev_video6.png [...] opencv__dev_video10.png opencv__dev_video12.png opencv__dev_video18.png [...] opencv__dev_video24.png
Note
Some cameras may take a few seconds to warm up, and the first frame might be black or green.
Note
Multiple Color Streams on Intel RealSense D405 (OpenCV Behavior)
When using the Intel® RealSense™ D405, you may observe two different “color” images in OpenCV: one bright and natural-looking, and another slightly dull. This behavior is expected and results from the D405’s internal hardware architecture.
Internal Camera Architecture
The D405 contains:
A stereo depth module (D401) with left and right global shutter imagers
A dedicated RGB sensor (OmniVision OV9782)
An onboard Image Signal Processor (ISP) for RGB processing
The camera exposes multiple video streams as separate UVC endpoints:
UYVY (Left Stereo Imager) - Originates from the stereo depth sensor, optimized for depth matching (not color accuracy), limited color fidelity, appears flatter or duller
YUY2 (RGB Sensor OV9782 via ISP) - Comes from the dedicated RGB sensor, processed through the ISP (white balance, demosaicing, color correction, gamma, exposure control), produces a bright, natural-looking image
Visual Comparison:
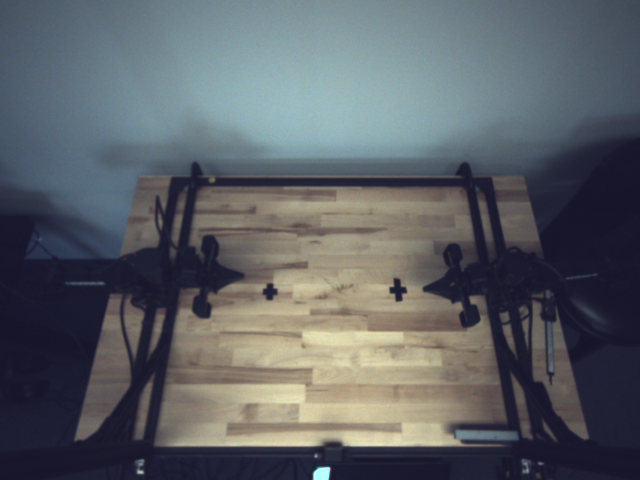
UYVY stream from left stereo imager (dull appearance)
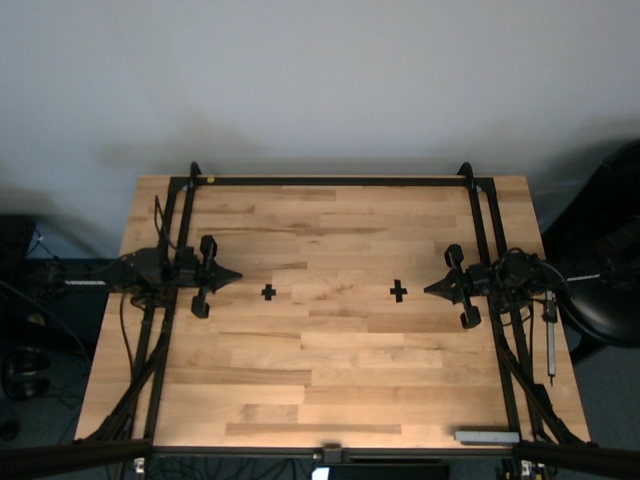
YUY2 stream from RGB sensor via ISP (bright, natural)
Which Stream Should Be Used?
For robotics, object detection, visual servoing, and color-based processing: Use the brighter YUY2 stream (RGB sensor OV9782 via ISP). The UYVY stream is primarily useful for stereo debugging or low-level inspection of the depth imager.
Review the captured images in
outputs/captured_imagesand select the video index that provides the bright, natural-looking YUY2 RGB stream.Find all the camera indices and put them in the appropriate dictionary items as specified above.