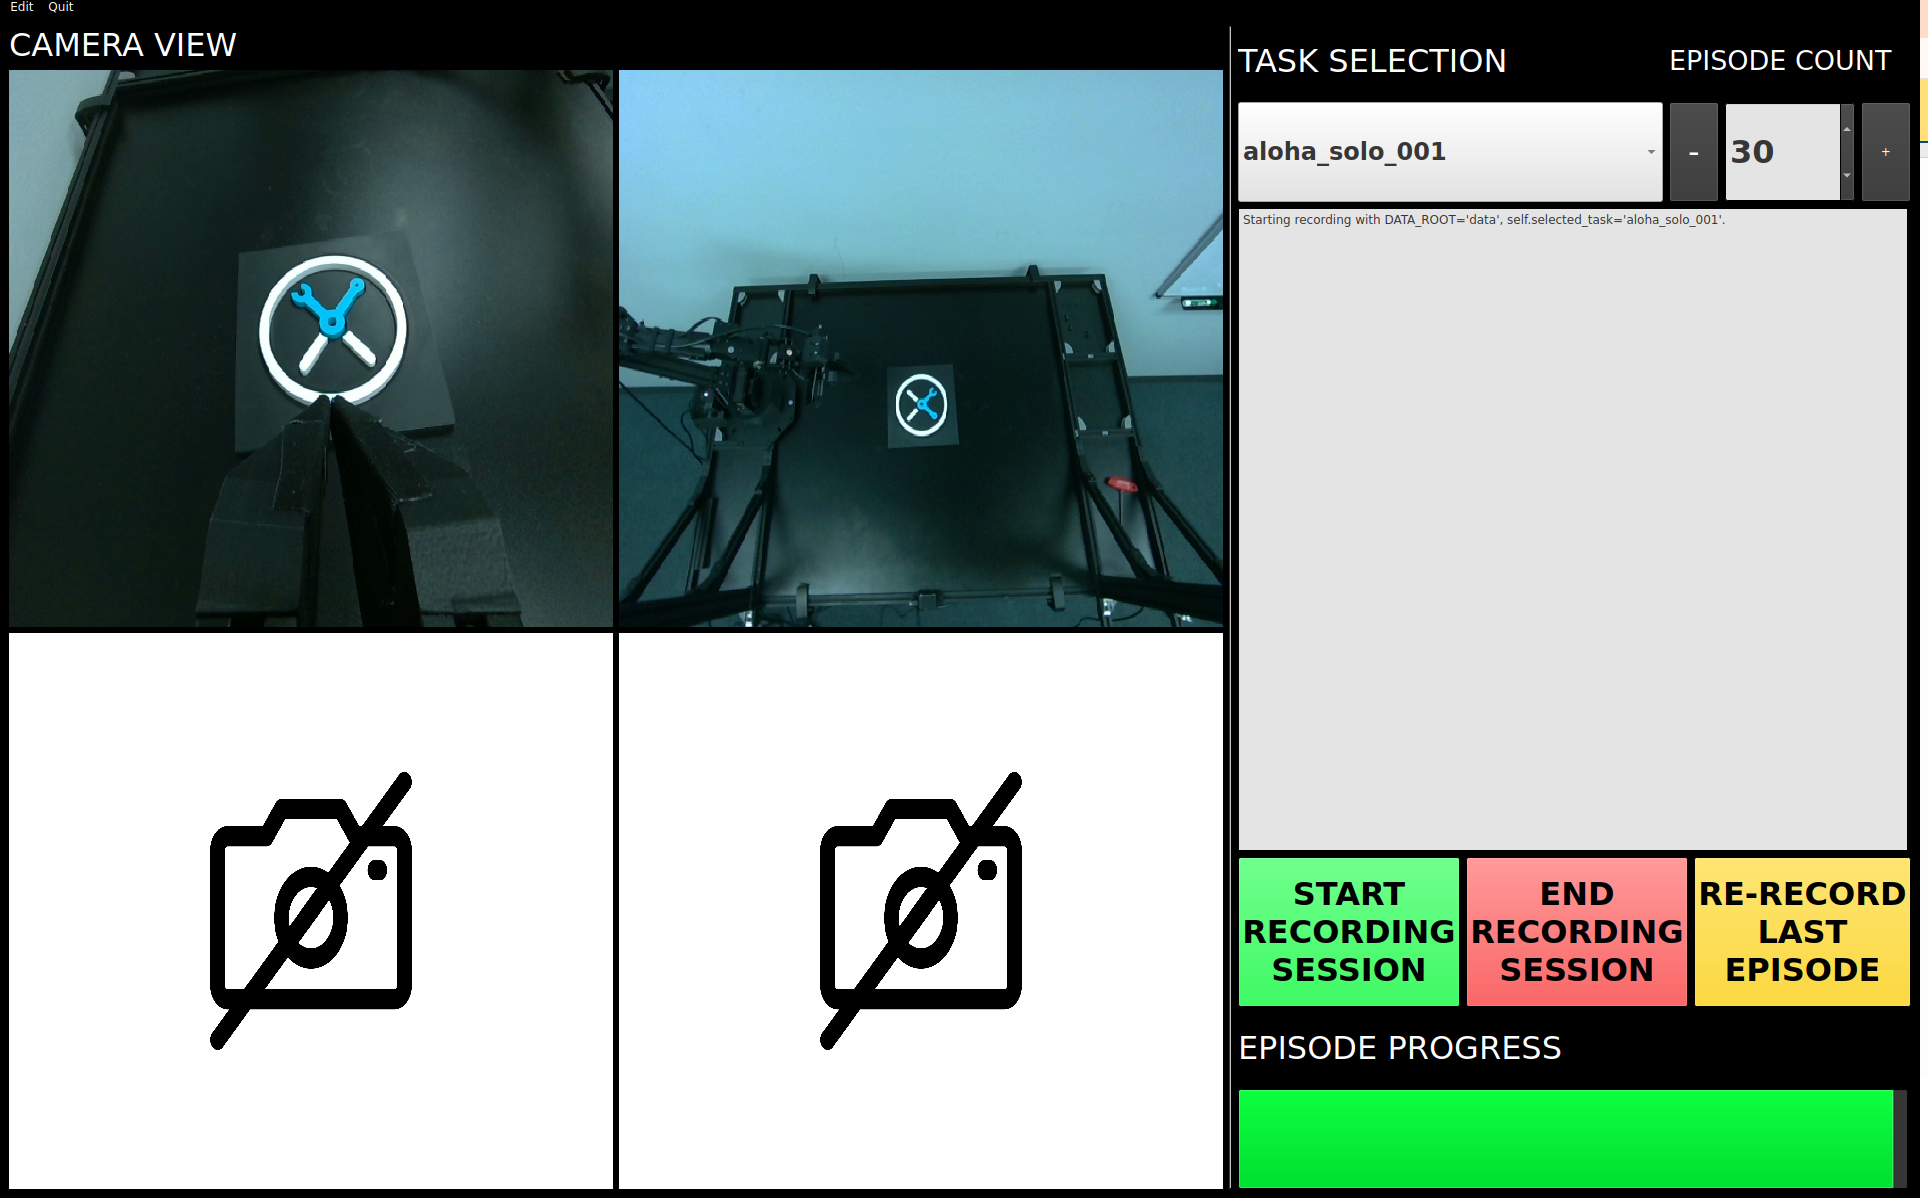
Trossen Aloha UI

Overview
Trossen Aloha UI is a Python-based application designed for seamless and efficient robotic data collection. It provides an intuitive GUI to manage robot configurations, perform task recordings, and streamline data collection with advanced features like camera views, task management, and progress tracking.
Pre-Installation Setup
Before installing the application, complete the following setup:
Install Miniconda: Download and install Miniconda for your operating system.
Create a Virtual Environment: Use Miniconda to create a virtual environment:
conda create -n aloha_env python=3.10 -y
conda activate aloha_env
Post-Installation
After installation, run the following command to set up the application:
- Clones and installs required dependencies for lerobot.
- Resolves common issues with OpenCV and video encoding.
- Creates a desktop icon for launching the application.
post_install
Launching the Application
Desktop Application
After installation, a desktop shortcut named Trossen Aloha UI is available. Click on it to launch the application.
Command Line
Alternatively, you can run the application directly from the terminal:
trossen_aloha_ui
Application Features
- Task Management:
- Task Names: Select predefined tasks from the dropdown menu.
- Episodes: Specify the number of episodes using the spin box. Adjust the count using the + and - buttons.
- Recording Controls:
- Start Recording: Initiates data collection for the selected task.
- Stop Recording: Stops the current data collection session.
- Re-Record: Allows re-recording of the current episode if necessary.
- Progress Tracking:
- A progress bar tracks the recording session in real-time, displaying completion percentage.
- Camera Views:
- View multiple camera feeds in real-time during recording for better monitoring.
- Configuration Management:
- Edit Robot Configuration: Modify the robot’s YAML configuration for granular control.
- Edit Task Configuration: Adjust task-specific parameters via a YAML editor.
- Quit Button:
- Use the Quit button in the menu to gracefully exit the application.
Configuration Management
The Trossen Aloha UI application provides two primary configuration files for setup:
- Task Configuration: Used to manage task-specific parameters like task names, episode lengths, warmup times, and more.
- Robot Configuration: Used to define arm and camera settings, motor limits, and safety parameters.
Task Configuration
Task-specific parameters are stored in the tasks_config.yaml file. Below is an example configuration:
tasks:
  - task_name: "aloha_solo_dummy"
    episode_length_s: 12
    warmup_time_s: 1
    reset_time_s: 5
    hf_user: "YourUser"
    fps: 30
    push_to_hub: false

  - task_name: "aloha_mobile_dummy"
    episode_length_s: 15
    warmup_time_s: 5
    reset_time_s: 10
    hf_user: "YourUser"
    fps: 30
    push_to_hub: false

  - task_name: "aloha_stationary_dummy"
    episode_length_s: 9
    warmup_time_s: 5
    reset_time_s: 5
    hf_user: "YourUser"
    fps: 30
    push_to_hub: false
Key Fields
- task_name: A unique identifier for the task. Ensure no duplicate task names exist.
- episode_length_s: Duration of each episode in seconds.
- warmup_time_s: Time in seconds for the system to warm up before starting the episode.
- reset_time_s: Time in seconds for the system to reset after each episode.
- hf_user: Your Hugging Face username to associate with the dataset.
- fps: Frames per second for recording data.
- push_to_hub: Set to true to upload datasets automatically to Hugging Face Hub. Ensure Hugging Face authentication is set up if this is enabled.
Hugging Face Authentication
To enable dataset uploads to the Hugging Face Hub, set up authentication using the following guide: Hugging Face Authentication Guide
Robot Configuration
The robot’s settings are defined in a YAML file (e.g., aloha_solo.yaml). Below is a simplified version of a robot configuration file:
_target_: lerobot.common.robot_devices.robots.manipulator.ManipulatorRobot
robot_type: aloha
calibration_dir: trossen_aloha_ui/configs/calibration/aloha_default

max_relative_target: null  # Set to null for more precise control once comfortable

leader_arms:
  right:
    _target_: lerobot.common.robot_devices.motors.dynamixel.DynamixelMotorsBus
    port: /dev/ttyDXL_leader_right
    motors:
      waist: [1, xm430-w350]
      shoulder: [2, xm430-w350]
      elbow: [4, xm430-w350]
      wrist_rotate: [8, xl430-w250]
      gripper: [9, xc430-w150]

follower_arms:
  right:
    _target_: lerobot.common.robot_devices.motors.dynamixel.DynamixelMotorsBus
    port: /dev/ttyDXL_follower_right
    motors:
      waist: [1, xm540-w270]
      shoulder: [2, xm540-w270]
      elbow: [4, xm540-w270]
      wrist_rotate: [8, xm430-w350]
      gripper: [9, xm430-w350]

cameras:
  cam_right_wrist:
    _target_: lerobot.common.robot_devices.cameras.intelrealsense.IntelRealSenseCamera
    serial_number: 218622272670
    fps: 30
    width: 640
    height: 480
  cam_top:
    _target_: lerobot.common.robot_devices.cameras.intelrealsense.IntelRealSenseCamera
    serial_number: 128422271347
    fps: 30
    width: 640
    height: 480
Key Fields
- max_relative_target: Limits the motion range of motors for safety. Set to null for precise control after gaining confidence.
- leader_arms / follower_arms: Specifies motor configurations for both leader and follower arms, including ports and motor models.
- cameras: Configures Intel RealSense cameras with serial numbers, frame rates, and resolutions.
- Set Ports for Arms: Update the port fields for leader_arms and follower_arms based on the symbolic links set for the robotic arms.
- Add Serial Numbers for Cameras: Use the Intel RealSense Viewer to obtain and add the correct serial numbers for each camera under the cameras section.
- Verify Calibration: Ensure the calibration_dir points to the appropriate calibration files.
Once the above configurations are completed, your setup is ready for teleoperation, data recording, and other tasks.
Hardware Setup
For detailed instructions on the hardware setup, please refer to the official documentation: Post-Install Hardware Setup.
This guide provides comprehensive information, including:
- Arm Configuration: Step-by-step guidance to assemble and connect the robotic arms.
- Camera Setup: Using the Intel RealSense Viewer for calibrating and positioning cameras effectively.