Mobile ALOHA Software Setup
Note
The Interbotix ALOHA Mobile control software is supported for ROS 2 Humble running on native Linux Ubuntu 22.04.
Note
If using a laptop supplied by Trossen Robotics, all required software will be pre-installed. In this case, you can skip to the Post-Install Hardware Setup section of this guide.
This guide will walk through the process of setting up the Interbotix ALOHA Mobile control software.
ROS 2 Installation
ROS 2 can be installed in one of two ways:
- (Preferred) Using the Interbotix X-Series Arm installation script. See the next section for details.
- Following the official ROS 2 Humble Ubuntu Debian install guide.
Interbotix X-Series Arm Control Software Installation
Follow the ROS 2 Standard Software Setup > AMD64 Architecture guide.
In short, run the following commands on a machine running Linux Ubuntu 22.04:
$ sudo apt install curl
$ curl 'https://raw.githubusercontent.com/Interbotix/interbotix_ros_manipulators/main/interbotix_ros_xsarms/install/amd64/xsarm_amd64_install.sh' > xsarm_amd64_install.sh
$ chmod +x xsarm_amd64_install.sh
$ ./xsarm_amd64_install.sh -d humble -n
The installation script does the following:
- Installs ROS 2 Humble (if not already installed).
- Creates the following directory structure:
~/interbotix_ws
  └── src
      ├── interbotix_ros_core
      ├── interbotix_ros_manipulators
      └── interbotix_ros_toolboxes
- Installs dependencies.
- Builds the control software and other related tools.
- Configures the ROS 2 environment.
Tip
After running the install script, remove all added lines beneath the # Interbotix Configurations header in the ~/.bashrc file.
Doing so will make environment configuration easier later on.
SLATE Base Software Install
The SLATE base control software is provided with the Interbotix installation but is not built by default. To build the SLATE base control software, run the following commands:
$ rm ~/interbotix_ws/src/interbotix_ros_core/interbotix_ros_slate/COLCON_IGNORE
$ cd ~/interbotix_ws
$ colcon build
ALOHA Software Installation
- Clone the Interbotix fork of ALOHA into the workspace’s source directory:
$ cd ~/interbotix_ws/src
$ git clone https://github.com/Interbotix/aloha.git
- Run rosdep to install any dependencies:
$ cd ~/interbotix_ws
$ rosdep install --from-paths src --ignore-src -r -y
- Set the
InterbotixManipulatorXS’siterative_update_fkdefault value toFalseat~/interbotix_ws/src/interbotix_ros_toolboxes/interbotix_xs_toolbox/interbotix_xs_modules/interbotix_xs_modules/xs_robot/arm.py(link).
- Add the following line to your
~/.bashrcfile:
$ echo "export INTERBOTIX_ALOHA_IS_MOBILE=true" >> ~/.bashrc
- Build the workspace:
$ cd ~/interbotix_ws
$ colcon build
Note
If planning to change the control or data collection software later on, you may want to do a symbolically-linked install.
If that is the case, remove the build and install directories, and re-run colcon build with the --symlink-install flag.
$ cd ~/interbotix_ws
$ rm -rf build install
$ colcon build --symlink-install
Post-Install Hardware Setup
The arm and cameras need to be bound to a unique device. The following sections will provide steps on setting up unique symbolic links for each device.
Arm Symlink Setup
We will configure udev rules for the arms such that they are bound to the following device names:
ttyDXL_leader_leftttyDXL_leader_rightttyDXL_follower_leftttyDXL_follower_right
To set these up, do the following:
- Plug in only the leader left robot to the computer.
- Determine its device name by checking the
/devdirectory before and after plugging the device in. This is likely something like/dev/ttyUSB0. - Print out the device serial number by running the following command:
$ udevadm info --name=/dev/ttyUSB0 --attribute-walk | grep ATTRS{serial} | head -n 1 | cut -d '"' -f2
FT88YWBJ
- The output of the command will look like
FT88YWBJand be the serial number of the arm’s U2D2 serial converter. - Add the following line to the computer’s fixed Interbotix udev rules at
/etc/udev/rules.d/99-fixed-interbotix-udev.rules:
SUBSYSTEM=="tty", ATTRS{serial}=="<SERIAL NUMBER>", ENV{ID_MM_DEVICE_IGNORE}="1", ATTR{device/latency_timer}="1", SYMLINK+="ttyDXL_leader_left"
#                                 ^^^^^^^^^^^^^^^ The result from the previous step
- Repeat for the rest of the arms.
- To update and refresh the rules, run the following command:
$ sudo udevadm control --reload && sudo udevadm trigger
- Plug all arms back into the computer and verify that you can see all devices:
$ ls /dev | grep ttyDXL_
ttyDXL_leader_left
ttyDXL_leader_right
ttyDXL_follower_left
ttyDXL_follower_right
Camera Setup
- Open realsense-viewer
$ realsense-viewerNote
If realsense-viewer is not already installed on your machine, follow these steps on the librealsense GitHub repository to install
librealsense2-utils.
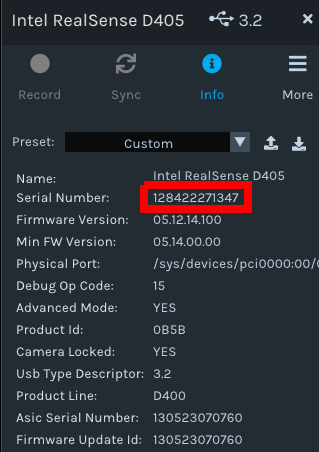
- Plug in a single camera and check the sidebar for its entry. If it does not show up in the side bar, click Add Source and find the Intel RealSense D405 in the drop down.
- Click on Info for the camera, find the Serial Number, and copy it.
- Put the camera serial number in the appropriate config entry at
~/interbotix_ws/src/aloha/config/rs_cam.yaml. - Repeat for the rest of the cameras. If the workspace has not been symbolically-linked, a rebuild may be necessary.
Post-Install Software Tips
Removing brltty
The USB-Serial converter in the SLATE base shares the same vendor and product ID with some brail readers.
Because of this, the brltty program may claim the device, preventing its use by other drivers.
Solving this issue is as simple as removing the package using apt.
$ sudo apt-get remove brltty
Disable wandb
It may be helpful to disable wandb while getting started. To do so, run the command below. Note that this line is added by default to the laptops distributed by Trossen Robotics.
$ echo "WANDB_MODE=disabled" >> ~/.bashrc
Alias Setup
It may be helpful to create bash aliases to make environment configuration easier.
Create a ~/.bash_aliases file:
$ touch ~/.bash_aliases
To create an alias that can be used to set up the ROS 2 environment, add the following line to the ~/.bash_aliases file:
alias setup_aloha="source /opt/ros/humble/setup.bash && source ~/interbotix_ws/install/setup.bash"
Assuming that dependencies of ACT were installed using a venv, to create an alias that can be used to set up the ROS 2 and ACT environments, add the following line to the ~/.bash_aliases file:
alias setup_act="setup_aloha && source /<path_to_aloha_venv>/bin/activate"